AWS Elastic Beanstalk (EBS), Amazon RDS, Environment Variables, and Product Service Deployment
Topics to be Covered
- Elastic Beanstalk (EBS)
- Amazon Relational Database Service (RDS)
- Environment Variablesuct Service Deployment
Elastic Beanstalk (EBS)
Overview of EC2 and the Need for EBS
EC2 instances are virtual servers in the AWS cloud. EC2 provides the raw compute power needed to run applications, but managing these instances, especially as your application grows, can become complex. Tasks such as load balancing, scaling, and handling failures require constant attention.
This is where Elastic Beanstalk (EBS) comes into play. EBS is an orchestration service that abstracts the complexities of deploying and managing applications by automatically handling infrastructure provisioning, load balancing, scaling, and application health monitoring.
How EBS Simplifies Application Management
EBS acts as a manager for your application deployment. It orchestrates various AWS services to ensure your application remains available and performs optimally with minimal manual intervention. The main features of EBS include:
- Server Management: EBS automatically manages the number of servers (EC2 instances) needed based on the current load. It can add or remove instances as needed.
- Load Balancing: EBS integrates with an Elastic Load Balancer (ELB), which distributes incoming traffic across multiple EC2 instances. This ensures that your application can handle varying amounts of traffic without downtime. The client only needs to know the IP address of the load balancer, which simplifies the networking aspect.
- Application Deployment: EBS takes care of deploying your application code to the servers, managing the deployment process and handling any necessary updates.
Practical Example: Deploying a Java Application
To illustrate how EBS works, let's consider deploying a Java-based application called "Product Service." Java is a compiled language, meaning the source code needs to be compiled into bytecode before it can be executed. This bytecode is typically packaged into a .jar (Java ARchive) file.
Step 1: Compiling the Java Code
First, we compile our Java code to generate the .jar file. This file is the deployable artifact that contains all the classes and resources needed to run the application.
- Visual Aid:
- Compilation Process:
- Generated
.jarFile: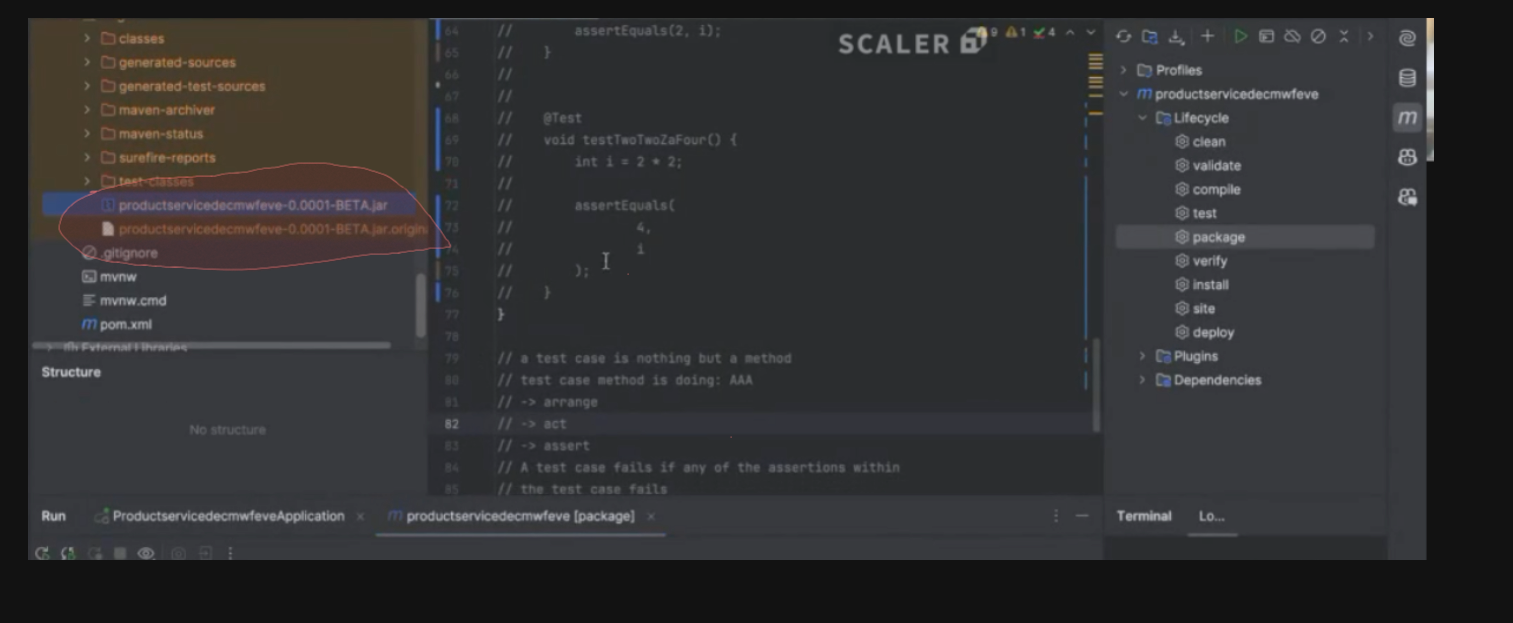
Instructor Note: Discuss the significance of the .jar file, including how it's named and structured.
Step 2: Running the .jar File
Once the .jar file is generated, it can be executed on any machine with the Java Runtime Environment (JRE) installed. The command to run the .jar file is:
java -jar name-of-jar.jar
What EBS Manages Behind the Scenes
When deploying this application using EBS, the service takes over several critical tasks:
- Server Scaling: EBS determines when to add or remove EC2 instances based on traffic patterns.
- Load Balancing: It routes incoming requests through a load balancer to the appropriate EC2 instance.
- Monitoring and Logging: EBS monitors the health of your application and logs any issues, providing you with real-time feedback.
This orchestration significantly reduces the workload for developers and operators, allowing them to focus on developing new features rather than managing infrastructure.
Amazon RDS (Relational Database Service)
Introduction to RDS
Amazon RDS (Relational Database Service) is a managed database service that simplifies the setup, operation, and scaling of relational databases in the cloud. RDS handles routine database tasks such as provisioning, patching, backup, recovery, and scaling, allowing you to focus on your application rather than database management.
Why Use RDS?
Managing a database involves several time-consuming tasks, including:
- Installation and Setup: Configuring the database software on a server.
- Backups and Recovery: Ensuring that data is regularly backed up and can be restored in case of failure.
- Patching and Updates: Keeping the database software up to date with the latest patches.
- Scaling: Adjusting the database's capacity to handle increasing loads.
RDS automates all these tasks, offering a fully managed experience where you only need to specify the type and size of the database, and RDS handles the rest.
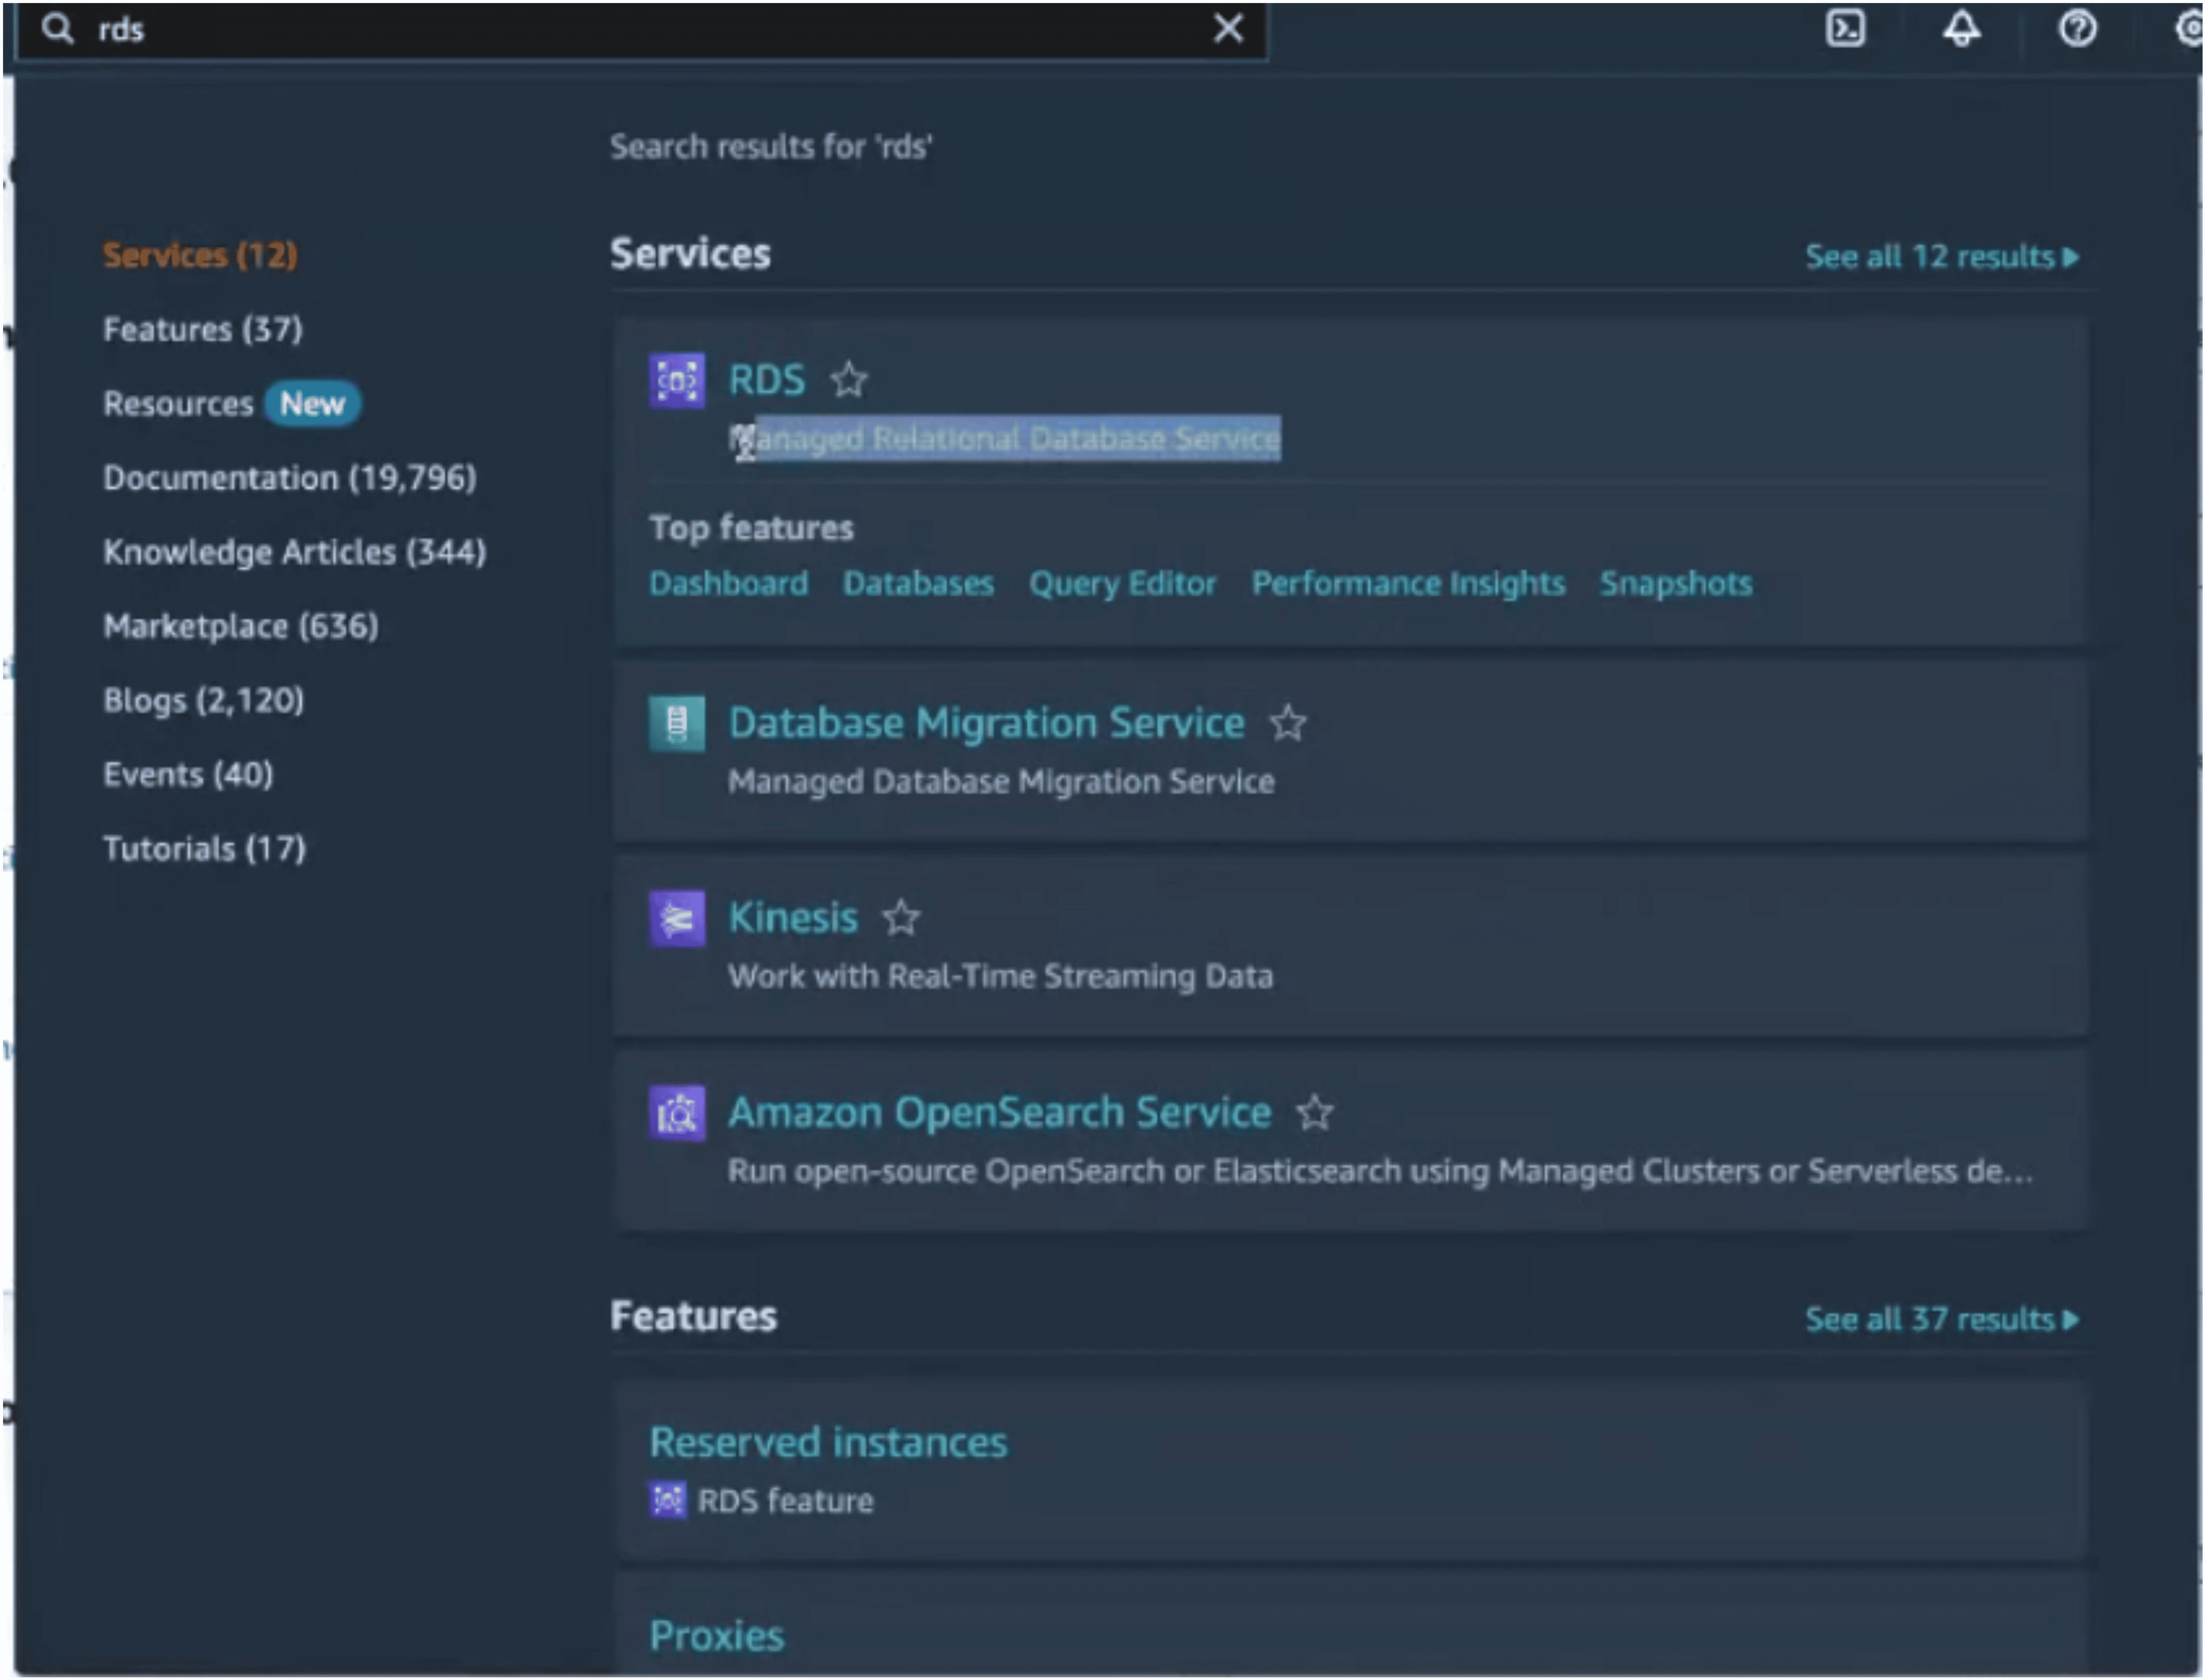
Deploying a Database with RDS
To integrate our product service with a database, we'll use Amazon RDS to deploy a MySQL database.
Step 1: Creating the Database
Using the AWS Management Console, we can create a new RDS instance by specifying the database engine, version, and instance size. We also have the option to enable features such as auto-scaling to automatically adjust the database's capacity based on demand.
- Visual Aid:
- RDS Creation Interface:
- Auto-Scaling Configuration:
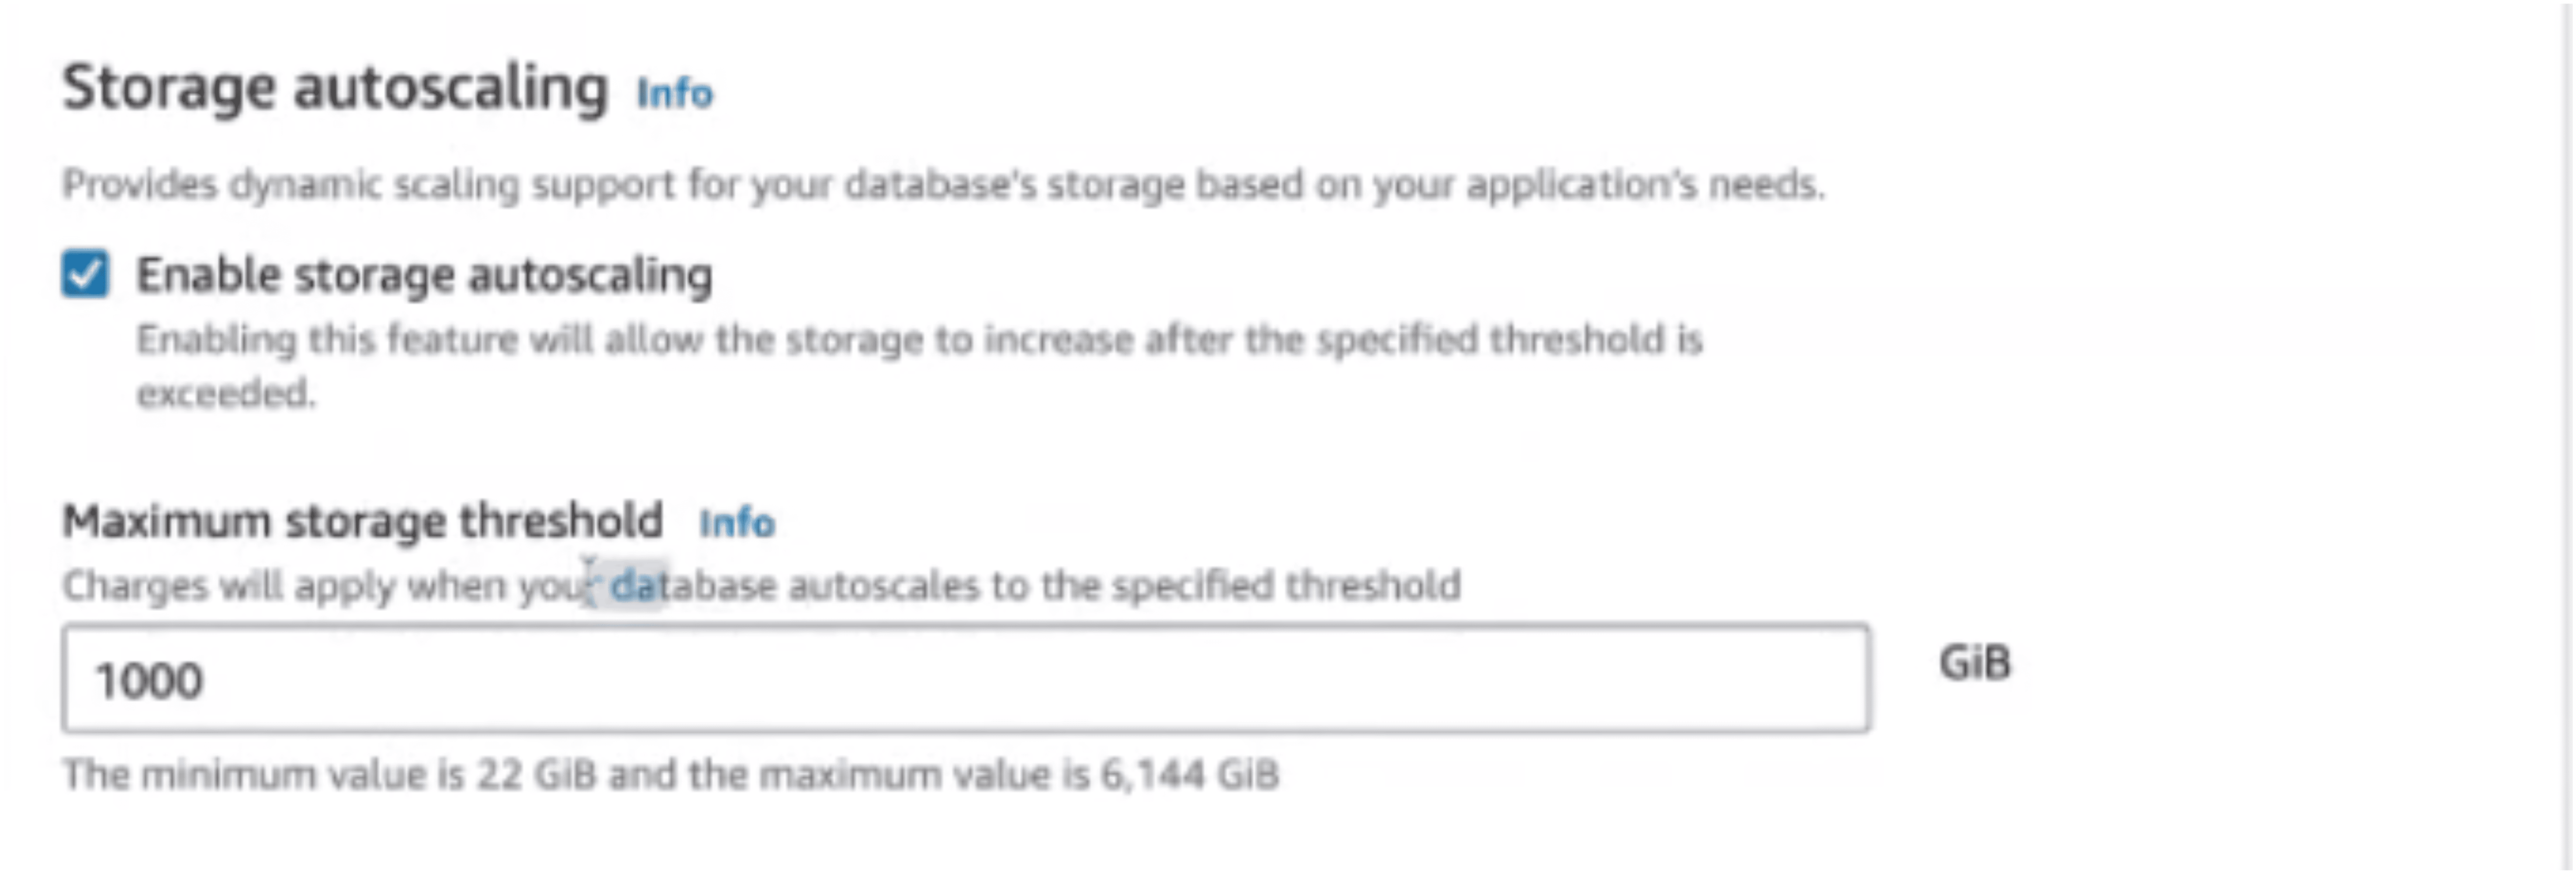
Instructor Note: Walk through the process of creating an RDS instance, highlighting options like maintenance settings and disk encryption for added security.
Step 2: Configuring Database Access
Security is a critical aspect of database management. With RDS, you can configure the database to accept connections only from specific EC2 instances, ensuring that unauthorized access is prevented even if credentials are compromised.
- Security Configuration: Specify that only the servers within your VPC (Virtual Private Cloud) can access the database. This adds an extra layer of security.
Step 3: Connecting to the Database from a Spring Application
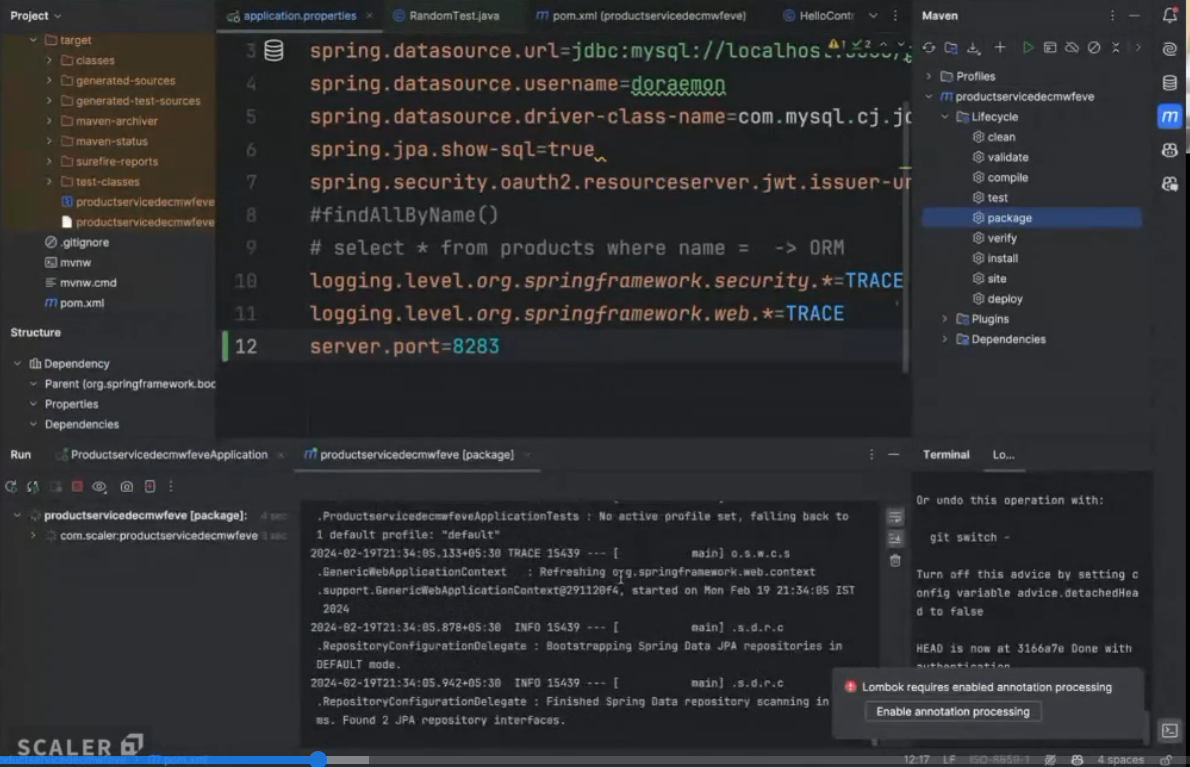
After the database is set up, we need to connect it to our Java application. This is done by updating the application.properties file with the database URL and credentials.
spring.datasource.url=jdbc:mysql://localhost:3306/productservicedecmwfeve
spring.datasource.username=${PRODUCT_SERVICE_DATABASE_USERNAME}
spring.datasource.password=${PRODUCT_SERVICE_DATABASE_PASSWORD}
By using environment variables (as we'll discuss next), we can avoid hardcoding sensitive information directly into the application code.
Environment Variables
Importance of Environment Variables
Environment variables are key-value pairs stored at the operating system level that applications can use to retrieve configuration information. This method of configuration management offers several advantages, particularly in terms of security and flexibility.
Security Benefits
Hardcoding sensitive information such as database URLs, usernames, and passwords directly into your application's source code is a risky practice. If the code is ever compromised, these credentials could be exposed to attackers. By using environment variables, sensitive information is stored separately from the code, reducing the risk of exposure.
Flexibility in Different Environments
Applications often need to run in different environments, such as development, testing, and production. Each environment may require different configuration settings, such as database URLs or API keys. By using environment variables, you can easily change the configuration based on the environment without modifying the code.
Example Configuration in application.properties
Here is an example of how environment variables can be used in a Spring application to configure database access and other settings:
spring.datasource.url=${PRODUCT_SERVICE_DATABASE_URL}
spring.datasource.username=${PRODUCT_SERVICE_DATABASE_USERNAME}
spring.datasource.password=${PRODUCT_SERVICE_DATABASE_PASSWORD}
spring.security.oauth2.resourceserver.jwt.issuer-uri=${USER_SERVICE_URL}
In this setup:
- The actual values for PRODUCT_SERVICE_DATABASE_URL, PRODUCT_SERVICE_DATABASE_USERNAME, and PRODUCT_SERVICE_DATABASE_PASSWORD are stored as environment variables.
- The application retrieves these values at runtime, ensuring that sensitive information is not exposed in the source code.
This approach not only enhances security but also makes it easier to manage different configurations for different environments.
Product Service Deployment
Preparing for Deployment
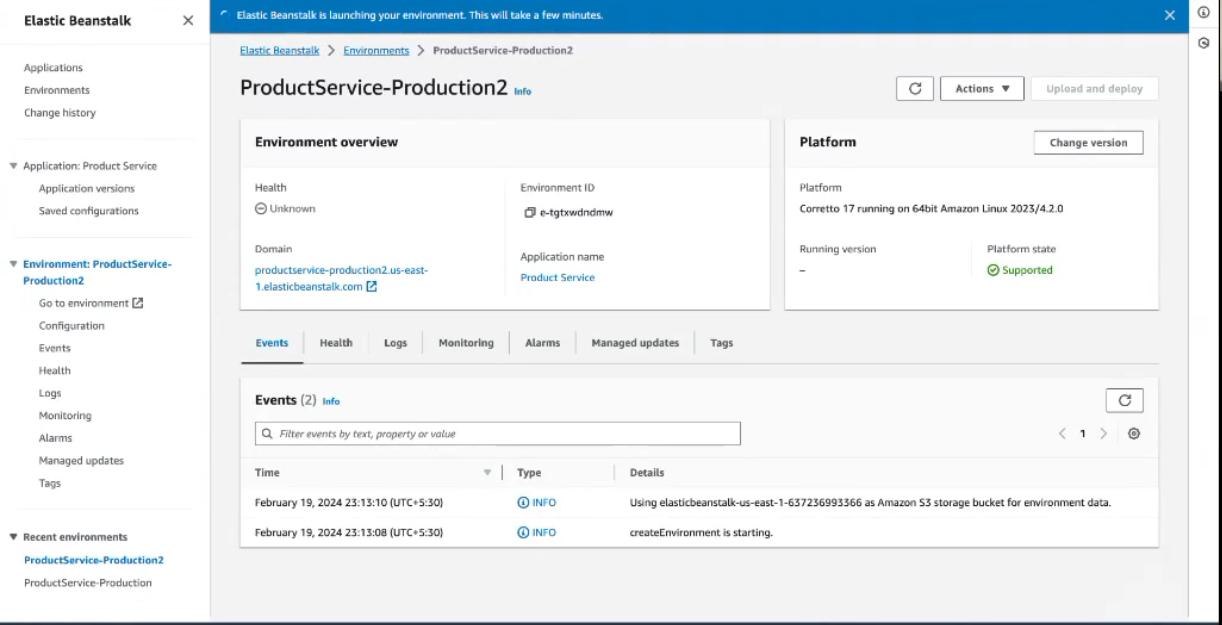
Now that we have our .jar file ready and our database deployed on RDS, we can proceed with deploying the Product Service using Elastic Beanstalk.
Step 1: Create the Elastic Beanstalk Environment
-
Choosing the Environment Type:
-
Elastic Beanstalk supports multiple environment types, such as single-instance or load-balanced environments. For our service, we may choose a load-balanced environment to handle high traffic.
-
Visual Aid:
- Environment Selection:
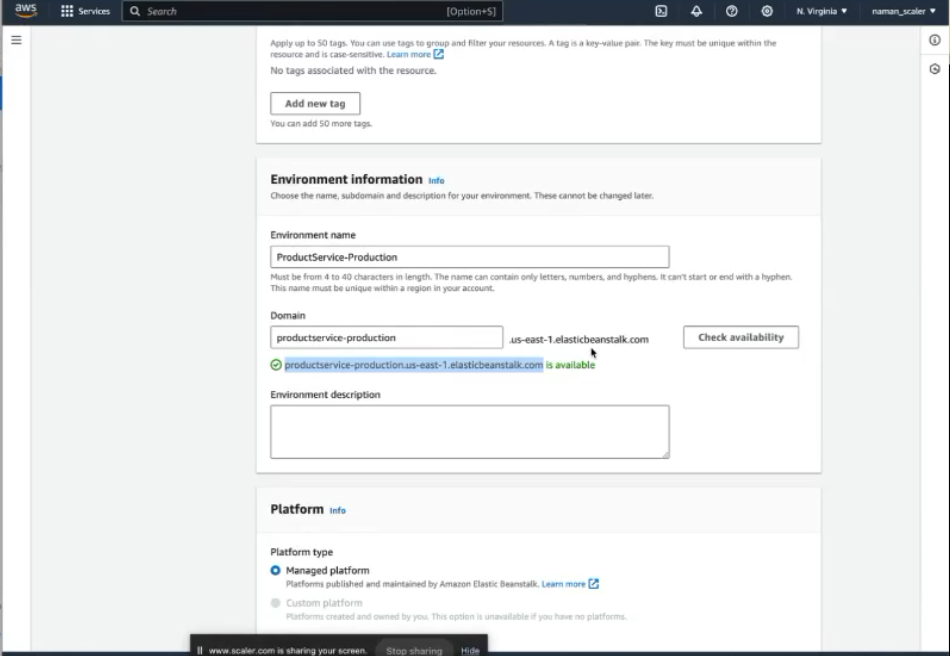
- Environment Selection:
-
-
Uploading the Application Code:
- Upload the compiled
.jarfile to Elastic Beanstalk. EBS will handle the deployment process, including creating EC2 instances and configuring the necessary resources.
Step 2: Configuring Permissions and Roles
EBS relies on other AWS services to function, such as EC2 for running the application and RDS for database connectivity. To interact with these services securely, EBS requires specific permissions, which are granted through service roles.
- Creating a Service Role:
- A service role is an IAM role that grants permissions to AWS services so they can interact with other AWS resources. In this case, we need to create
a service role that allows EBS to manage EC2 instances, access the RDS database, and configure the load balancer.
- Assigning the Service Role to EBS:
-
Once the service role is created and the necessary permissions are granted, it is assigned to the EBS environment.
-
Visual Aid:
- Service Role Configuration:
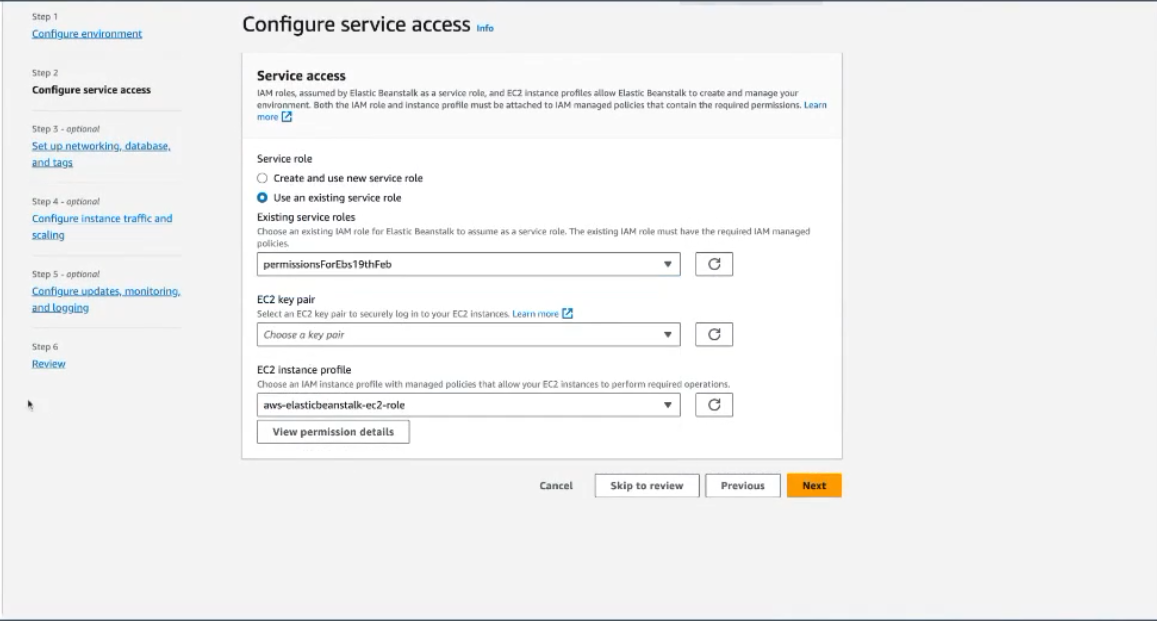
- Service Role Configuration:
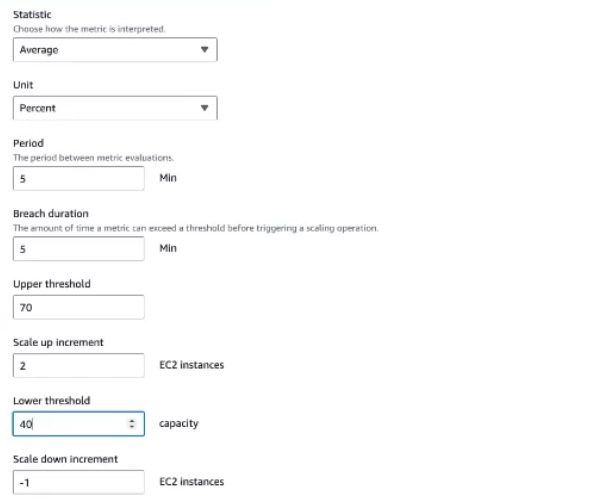
Step 3: Configuring Auto-Scaling and Monitoring
EBS provides several advanced features for managing the scalability and health of your application:
-
Auto-Scaling Groups:
- Auto-scaling ensures that your application can handle varying levels of traffic by automatically adjusting the number of EC2 instances. For example, you can set a policy to add more instances if CPU utilization exceeds 70% and reduce instances if it drops below 40%.
-
Visual Aid:
-
Auto-Scaling Example:
-
Monitoring:
- EBS continuously monitors the health of your application and the underlying infrastructure. It provides detailed logs and metrics that help you identify and resolve issues quickly.
Step 4: Configuring Listener Ports
The load balancer in EBS routes incoming traffic to the appropriate EC2 instances. The configuration of listener ports is crucial to ensure that the traffic is correctly directed:
-
Listener Port Configuration:
- Typically, the load balancer listens on port 80 (HTTP) or 443 (HTTPS). However, the application may run on a different port (e.g., 8283). EBS allows you to map the incoming traffic on port 80 to the application's port.
-
Visual Aid:
- Listener Ports Configuration:

- Listener Ports Configuration:
Step 5: Deployment Strategies
Elastic Beanstalk offers several deployment strategies, including:
- All-at-once: Deploys the new version of the application to all instances simultaneously.
- Rolling Updates: Deploys the new version gradually, ensuring that some instances remain operational during the deployment.
Choose the strategy that best suits your application's needs.
Step 6: Setting Environment Variables
Finally, configure any necessary environment variables at the OS level within the EBS environment. This ensures that sensitive information, such as database credentials, is securely managed.
- Visual Aid:
- Environment Variables Configuration:
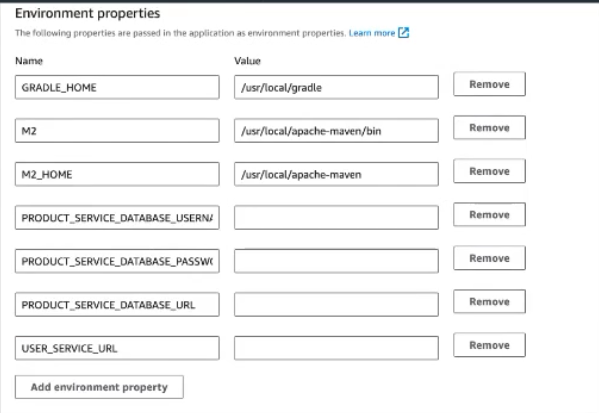
- Environment Variables Configuration:
Monitoring the Deployment Process
Once the deployment starts, EBS provides real-time feedback on the progress and any events that occur during the process. This includes the creation of resources, status updates, and any errors that might arise.
- Visual Aid:
- Deployment Events: