AWS EBS, VPC, Security Groups, Route 53, Checking Metrics
Topics to be covered
- User Service Deployment
- Virtual Private Cloud (VPC) and Security Groups
- Health Status Monitoring
- Deploying on Custom Domains
User Service Deployment
Steps for Deployment:
-
Deploy the Database:
- Begin by setting up the database that the user service will utilize. This involves configuring a relational database, such as MySQL or PostgreSQL, within AWS RDS (Relational Database Service). Ensure the database is correctly provisioned with appropriate settings, including instance type, storage capacity, and backup configurations.
-
Update Application Properties:
- The next step is to modify the
application.propertiesfile of the user-service to point to the newly deployed database. This file should include the database URL, username, password, and any additional settings required by the service. - Once updated, create a Java Archive (JAR) package of the user-service. This package will include all necessary libraries, resources, and metadata required for deployment.
- The next step is to modify the
-
Create a New Elastic Beanstalk Service (EBS) Environment:
- Set up a new environment in Elastic Beanstalk specifically for the user-service. Elastic Beanstalk automates the deployment, scaling, and management of applications, making it an ideal platform for our service.
- Ensure that the environment is configured with the correct platform, such as a Java SE or Tomcat environment, depending on your application.
-
Configure Elastic Beanstalk:
- Adjust key configurations within Elastic Beanstalk. This includes setting environment variables, configuring load balancers, and defining autoscaling rules.
- Pay particular attention to security settings, such as setting up HTTPS for secure communication and managing IAM roles to control access to AWS resources.
-
Deploy the User Service:
- Finally, deploy the user-service JAR package to Elastic Beanstalk. Once deployed, Elastic Beanstalk will automatically handle the provisioning of resources, including EC2 instances, and will manage the deployment process.
Post Deployment Actions:
-
Update the Product Service:
- After successfully deploying the user-service, it's crucial to integrate it with the product service. Update the
application.propertiesfile of the product service to include the URL of the user-service. This ensures that the product service can authenticate and authorize requests via the user-service.
- After successfully deploying the user-service, it's crucial to integrate it with the product service. Update the
-
Re-deploy the Product Service:
- With the updated configurations, re-deploy the product service to Elastic Beanstalk. This ensures that both services are correctly linked and operational.
logging.level.org.springframework.web=TRACE
spring.jpa.hibernate.ddl-auto=validate
spring.datasource.url=${PRODUCT_SERVICE_DATABASE_URL}
spring.datasource.username=${PRODUCT_SERVICE_DATABASE_USERNAME}
spring.datasource.password=${PRODUCT_SERVICE_DATABASE_PASSWORD}
spring.datasource.driver-class-name=com.mysql.cj.jdbc.Driver
spring.jpa.show-sql=true
spring.security.oauth2.resourceserver.jwt.issuer-uri=${USER_SERVICE_URL}
logging.level.org.springframework.security.*=TRACE
logging.level.org.springframework.web.*=TRACE
server.port=8283
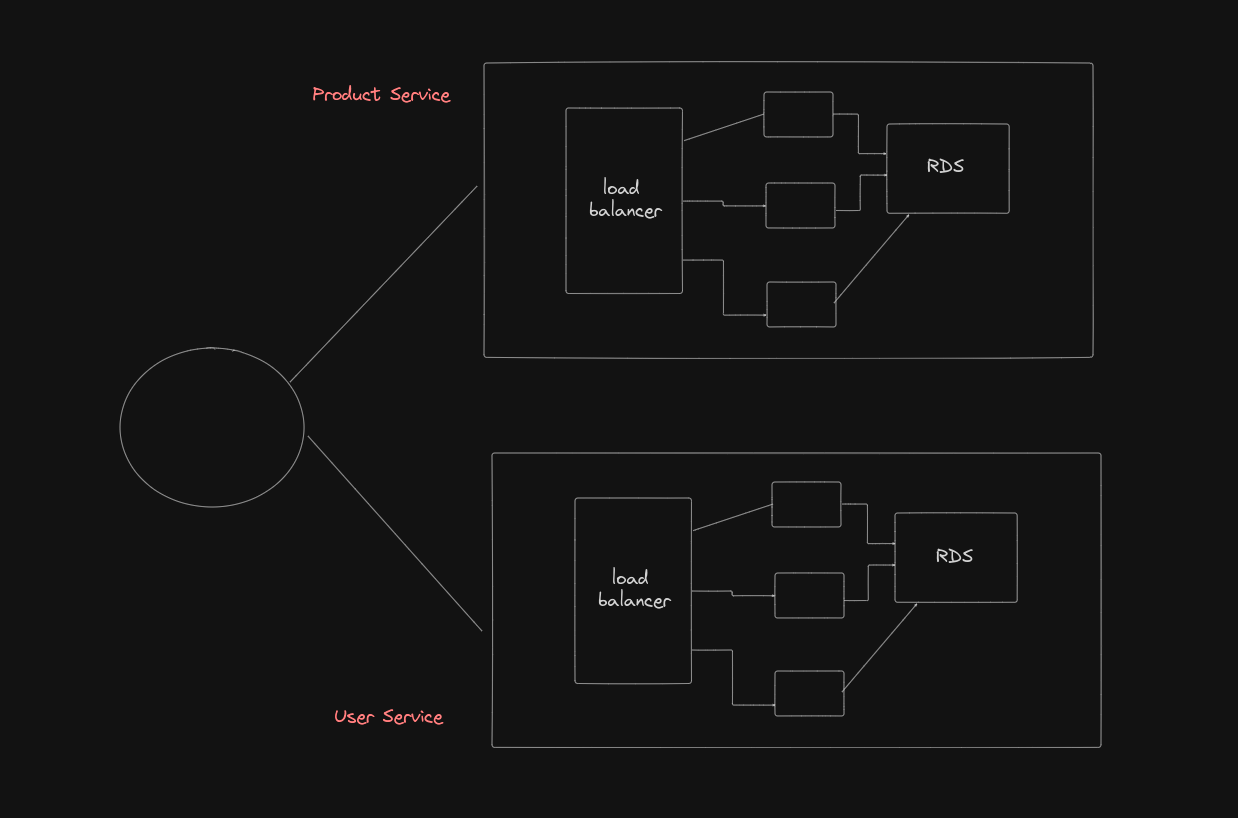
- Final Outcome: Both the user-service and product-service should now be fully deployed and functional. This interconnected deployment is a fundamental step in building a robust, microservices-based architecture.

Virtual Private Cloud (VPC) and Security Groups
Introduction:
As our applications grow in complexity, securing the infrastructure becomes increasingly critical. In this section, we will explore how AWS Virtual Private Cloud (VPC) and Security Groups can be used to enhance security by isolating resources and controlling traffic.
Application Architecture Overview:
The architecture of our application consists of multiple interconnected services, each with its own database and functionality. These services must be protected from unauthorized access while allowing legitimate communication between them.
Security Challenges:
-
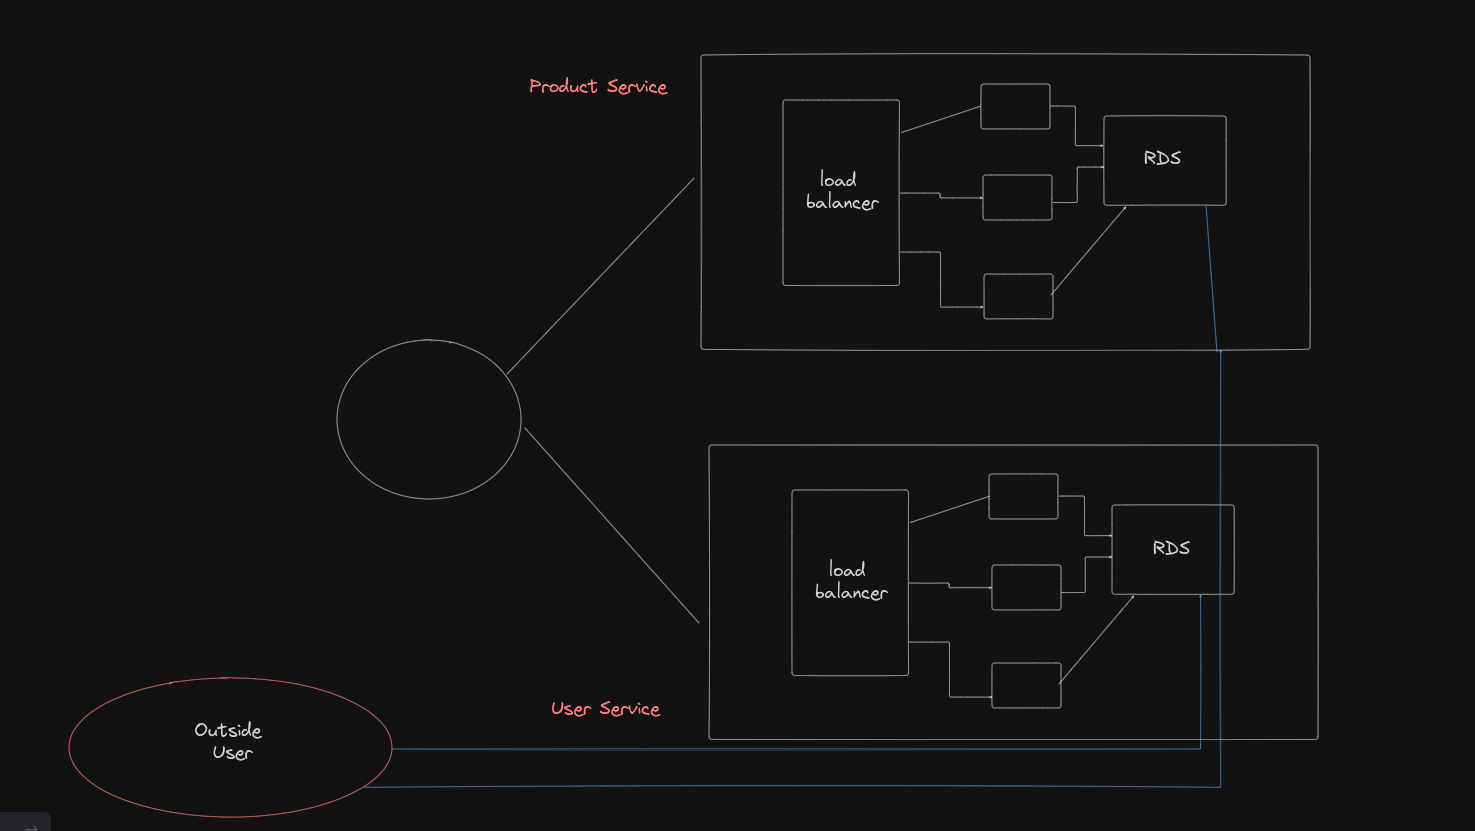
Unrestricted Database Access:
- Currently, if someone outside the network has the correct credentials (username, password, and URL), they can access the database directly. This presents a significant security risk, as databases often contain sensitive information.
-
Example Scenario:
- Suppose you attempt to connect to the database using an external tool like IntelliJ. Without proper restrictions, such access is possible, highlighting the need for enhanced security.
 )
)
Solution - Implementing Virtual Private Cloud (VPC):
-
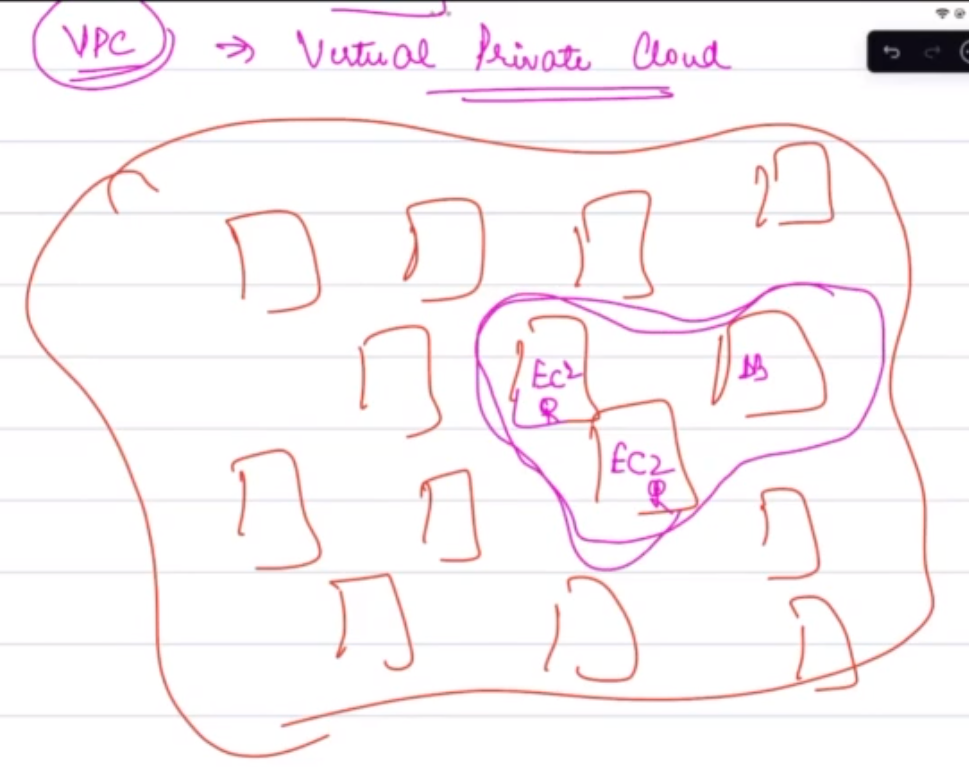
VPC Overview:
- AWS provides a Virtual Private Cloud (VPC) as a means of isolating resources within a virtual network that is logically separated from other AWS customers. By placing services within a VPC, you can control who has access to these services and ensure that only authorized traffic is allowed.
-
Practical Example:
- Imagine AWS as a large city with numerous buildings (services). By creating a VPC, you are essentially constructing a gated community within this city, where only residents (services within the VPC) can interact with each other. External entities must go through strict checkpoints (security groups) to gain access.
Enhancing Security with Security Groups:
-
Security Groups:
- Security Groups act as virtual firewalls for your EC2 instances or other AWS resources within a VPC. They consist of a set of rules that define which incoming and outgoing traffic is allowed.
-
Best Practices:
- While AWS provides default security groups, it is recommended to create custom security groups tailored to the specific needs of each service. This avoids potential security issues where changes to a default security group could inadvertently affect multiple services.
-
Example: Consider our application’s architecture, where the authentication service and the product service each have their own databases. By creating specific security groups, we can ensure that only the authentication service can access its database and similarly for the product service.
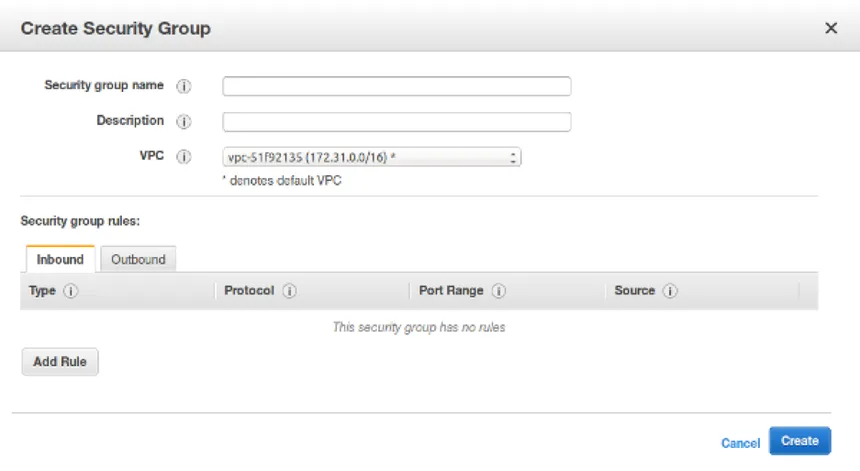
- Inbound and Outbound Rules:
- Inbound Rules: These rules specify which sources (e.g., IP addresses or other services) can send requests to your service.
- Outbound Rules: These rules determine where your service can send requests, such as to other databases or services within the VPC.
Application and Testing:
-
Applying Security Groups:
- After setting up the appropriate security groups, apply them to your EC2 instances or other AWS resources. This ensures that only authorized traffic is permitted, greatly enhancing the security of your application.
-
Validation:
- Once the security groups are applied, test the application to confirm that unauthorized external tools (such as IntelliJ) can no longer connect directly to the database. This demonstrates the effectiveness of the security measures.
Health Status
Introduction:
Ensuring the stability of services during updates is critical in a production environment. In this section, we’ll discuss how to implement health status checks in AWS Elastic Beanstalk to monitor the health of services during and after deployment.
Rolling Deployment Overview:
- Rolling Deployment Process:
- When deploying an update to a service, AWS Elastic Beanstalk uses a rolling deployment strategy. This strategy involves gradually updating instances behind a load balancer to ensure minimal downtime. The steps include:
- The load balancer takes one server offline.
- The new version of the service is deployed on that server.
- The server is checked to ensure it is functioning correctly.
- The server is brought back online and reconnected to the load balancer.
- When deploying an update to a service, AWS Elastic Beanstalk uses a rolling deployment strategy. This strategy involves gradually updating instances behind a load balancer to ensure minimal downtime. The steps include:
Health Status Checks:
-
Purpose:
- Health status checks are automated tests that Elastic Beanstalk uses to verify that a server is healthy after an update. These checks are critical to prevent issues like service outages or degraded performance.
-
Configuration:
- Elastic Beanstalk allows you to configure health checks by specifying a URL endpoint that it should monitor. The health check continuously sends HTTP requests to this endpoint and expects a 200 status code as a sign of success.
-
Example:
- You can configure the health check to send a request every 5 seconds to the root path (
/) and expect a 200 status code. If this condition is met five times in a row, the server is considered healthy, and the deployment can proceed.
- You can configure the health check to send a request every 5 seconds to the root path (
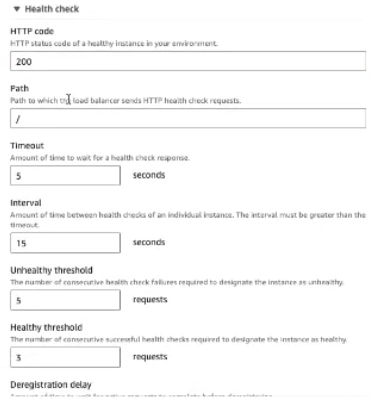
- Detailed Example:
- Suppose the health check configuration is set as follows:
- Path:
/ - Interval: 5 seconds
- Timeout: 5 seconds
- Healthy Threshold: 5 times
- Path:
- Suppose the health check configuration is set as follows:
This configuration instructs Elastic Beanstalk to ensure the service responds with a 200 status code at the specified intervals before declaring the server healthy.
For better clarity you can refer to the documanetation Spring Boot Actuator .
Deploy on Custom Domains
Introduction:
Using a custom domain name for your services not only improves branding but also makes it easier for users to access and remember your service URLs. In this section, we’ll walk through the process of setting up a custom domain for your AWS-deployed services.
Steps to Deploy on Custom Domains:
-
Obtain a Domain Name:
- If you don’t already have a domain name, you can obtain one through various domain registrars. The GitHub Student Developer Pack offers a free domain name for one year through services like namecheap.com, name.com, or get.tech.
-
Domain Name Settings:
- Once you have your domain, you can manage its settings through the registrar’s website. This includes configuring DNS records, which direct traffic from your domain to specific servers or services.
-
Configure AWS Route 53:
- AWS Route 53 is a scalable DNS web service designed to route end-user requests to AWS applications efficiently. To use your custom domain with AWS, you need to create a hosted zone in Route 53 and add your domain name to it.
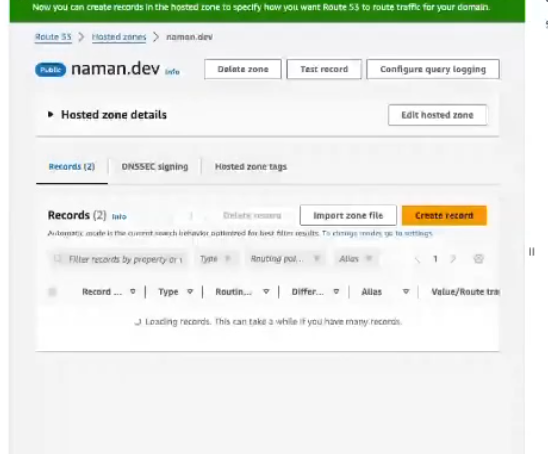
-
Set Up Name Servers:
- After setting up Route 53, you will receive name server addresses. These need to be configured in your domain registrar’s settings to ensure that your domain points to the AWS-hosted services.
-
Understanding Routing Policies:
- Route 53 offers several routing policies to manage how traffic is directed:
- Simple Routing: Directs traffic to a single resource without health checks.
- Failover Routing: Routes traffic to a primary resource, and if it fails, to a secondary resource.
- Geolocation Routing: Routes traffic based on the geographic location of the user.
- Geoproximity Routing: Routes traffic based on the geographic location of resources and optionally shifts traffic from one resource to another.
- Latency Routing: Routes traffic to the resource with the lowest latency for the user.
- Multivalue Answer Routing: Returns multiple IP addresses for a DNS query, with optional health checks.
- Weighted Routing: Distributes traffic across multiple resources based on specified weights.
- Route 53 offers several routing policies to manage how traffic is directed:
-
Choosing a Routing Policy:
- Depending on your specific use case, select a routing policy that best suits your needs. For example, if your service is global, Geolocation Routing can help ensure that users are directed to the nearest server to reduce latency.
-
Assigning a Domain Name:
- Once your routing policy is in place, assign a specific subdomain to your service. For instance, if your domain is
naman.dev, you could assignproduct.naman.devto your product service. This makes the service accessible through the custom domain.
- Once your routing policy is in place, assign a specific subdomain to your service. For instance, if your domain is
-
Testing the Configuration:
- After the configuration is complete, test the domain by accessing it through a web browser. Ensure that the service responds correctly and that the domain name is properly routed to the AWS service.
