JWT, OAuth 2.0 and Implementing a User Service
Topics to be Covered
- JWT (JSON Web Token)
- OAuth 2.0
- Implementing a User Service
Overview
Sign-up Process
- User Input: The client provides an email and password for sign-up.
- Verification: The server sends a verification email to the client. The user must confirm the email address by clicking a verification link.
- Password Hashing: Once the email is verified, the server hashes the user’s password using bcrypt. This hashing ensures that even if the database is compromised, the original password cannot be retrieved.
- Data Storage: The verified email, name, and hashed password are stored securely in the database.
Login Process
- Password Verification: When the user logs in, the server does not compare the plain-text password directly with the database entry, as bcrypt generates a unique hash each time. Instead, it uses the
.verify()method to check if the password matches the stored hash. - Token Generation: Upon successful password verification, the server generates a token for the user. This token contains essential information such as the user ID, token value, expiry time, and IP address.
- Token Usage: For every subsequent request, the client sends this token, which the server verifies by checking the token’s validity (e.g., whether it exists and hasn’t expired) by querying the database.
Problems in the Previous Approach
- Database Calls on Every Request: For every client request, the server has to query the database to verify the token, which slows down the application and introduces latency.
- Cache Consideration: While using a cache can speed up token verification, it introduces additional costs and complexity. The cache must stay in sync with the database, which can be challenging to maintain.
- New Approach: A more efficient approach would be to validate the token without any external network calls, relying only on CPU processing. This would drastically reduce the time it takes to validate requests.
JSON Web Token (JWT)
Introduction to JWT
JWT solves the problem of repeatedly querying the database to verify tokens. It allows us to embed all the necessary information within the token itself, enabling self-validation without making a database call.
Problem Breakdown:
- What information does the server usually get from the database to validate a token?
- Expiry time
- User ID
- Whether the token exists
- New Approach: We can embed this information inside the token using Base64 encoding and make the token self-contained.
Encoding and Hashing
Before diving deeper, it’s important to differentiate between encoding and hashing: - Encoding: Data can be encoded and then decoded back into its original form. This is reversible. - Hashing: Hashing is one-way. Once data is hashed, it cannot be retrieved in its original form.
Base64 Encoding Example: Consider encoding a message for secure transmission in the military. The message is encoded before being sent, and the receiver decodes it upon arrival.
How JWT Works
To solve the database call issue, we store information like user ID and expiry time directly in the token. This is done through Base64 encoding, which makes the token self-contained and verifiable without external checks.
- Structure of JWT:
-
JWT consists of three parts separated by dots:
A.B.C.- Part B: The base64-encoded message containing user data like user ID, email, role, and expiry time.
Example:
{ "user_id": "12345", "email": "user@example.com", "role": ["admin"], "expiry_at": "26th Feb, 2024" }- Part A: This contains the algorithm metadata used to encrypt the token. Typically, this would be HS256 (HMAC with SHA-256).
{ "algo": "HS256" }- Part C: This is the HS256-encrypted combination of Parts A and B along with a secret key known only to the server. The token structure is
A.B.C.
-
Base64 Encoding Example: You can demonstrate encoding and decoding live using a website like Base64 to help students visualize how this works.
-
Why Encryption is Needed: Base64-encoded tokens can be easily decoded, which means anyone could read or alter the information in the token. Therefore, we encrypt the token using a secret key known only to the server. This ensures that even if someone alters the token, the server won’t be able to decrypt it, thus invalidating the token.
Verifying the JWT
When the server receives a token, it splits it into three parts (A, B, C) and performs the following steps:
- Decrypt Part C using the server’s secret key.
- If the decryption fails, the token is considered invalid.
- If decryption succeeds, the server compares the decrypted value with the combination of A and B. If they match, the token is valid.
- If the values don’t match, the token has been tampered with and is rejected.
Key Point:
Do not include any sensitive or private information in Part B of the token, as it can be easily decoded by anyone.
JWT as a Self-Validating Token
JWTs are referred to as self-validating tokens because they contain all the necessary information required to verify their authenticity without making a database call. This makes the process much faster and more efficient.
- Frontend Access to Token Information: The client-side (frontend) can decode and view the public information contained in Part B, such as email and role, without needing access to the server’s secret key. However, the token cannot be altered, as the server will reject any changes during decryption.
Monolithic vs. Microservices Architecture
Monolithic Applications
Monolithic applications bundle all services (e.g., payment, product, order) into one large application. While this simplifies development initially, it poses several challenges as the application grows:
- Scaling: Scaling a monolithic application means deploying the entire application on multiple servers, which can be inefficient as all services (even those not required) are duplicated.
- Slower Performance: As the application size increases, the system becomes slower to run and more difficult to maintain.
- Complexity for New Developers: New team members have to understand the entire codebase, which can be overwhelming.
Microservices Architecture
In a microservices architecture, the application is broken into smaller, independent services, each responsible for a specific task (e.g., user service, product service). This has several advantages:
- Isolated Development: Each service can be developed and maintained independently, making it easier for teams to focus on their specific areas.
- Scaling Flexibility: Only the services that need to scale are replicated, which saves resources.
- Language Flexibility: Different services can be written in different programming languages, depending on their needs.
- Communication Between Services: Microservices communicate with each other via HTTP requests.
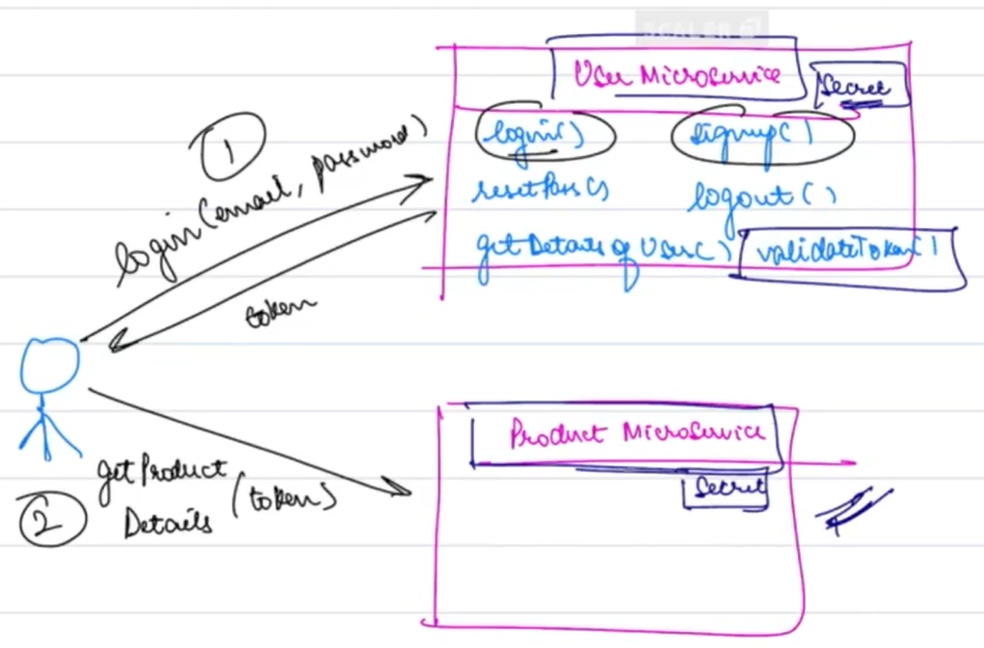
Token Validation in Microservices
In a microservices architecture, tokens play a crucial role in ensuring that services can validate user identities.
- Example: Suppose a user interacts with two services:
userServiceandproductService. After logging in viauserService, the user receives a token. To accessproductService, the user sends this token, and the service validates it using the secret key.
OAuth 2.0
The Purpose of OAuth
OAuth 2.0 is an industry-standard protocol for authorization, commonly used to grant access to third-party applications without exposing a user’s credentials. OAuth is especially useful when integrating third-party login options, such as "Login with Google" or "Login with GitHub."
- Example: Many websites allow users to log in through third-party services like Google or Facebook, instead of implementing their own login systems.
How OAuth Works
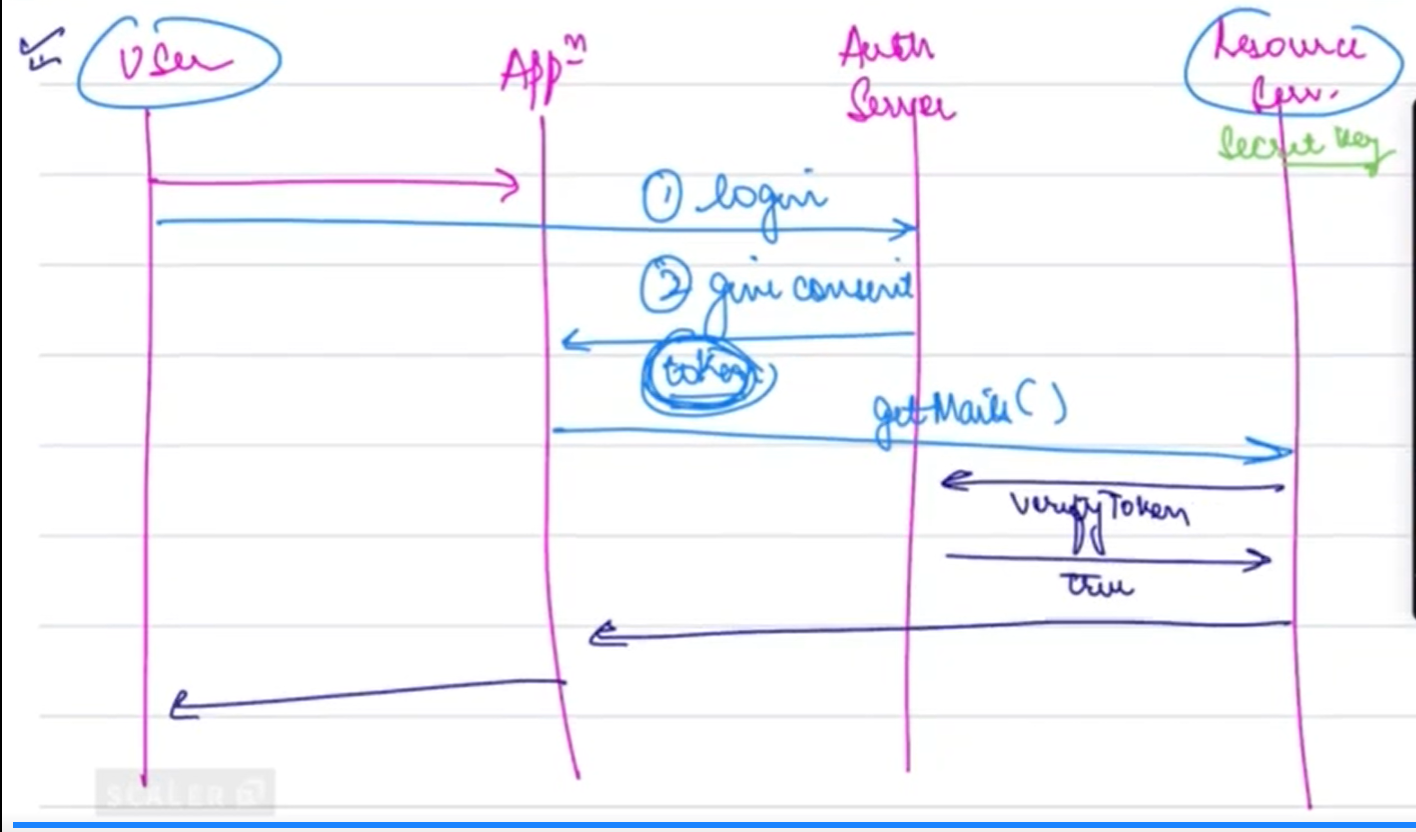
OAuth defines four key participants in the authorization process:
- User: The individual who wants to access a resource.
- Resource Server: The server that holds the protected resources (e.g., Google’s email server for Gmail).
- Application: The service that the user is trying to access (e.g., Scaler’s website).
- Authorization Server: The server that handles the login process and
generates tokens (e.g., Google’s OAuth server).
OAuth Flow:
- The user tries to access a resource on the Application.
- The application redirects the user to the Authorization Server for login.
- After login, the Authorization Server issues a token, which the user sends back to the application.
- The application uses this token to request resources from the Resource Server.
- The Resource Server validates the token, ensuring it is authentic (using the secret key or querying the Authorization Server), and grants access to the resources.
Implementing a User Service
LLD (Low-Level Design) of UserService
We will implement a user authentication service that manages users, roles, and tokens. The following components are essential:
-
User: This model will hold information about the user, including:
- id
- name
- hashed password
- a list of roles
- isEmailVerified (boolean)
-
Role: This model represents user roles, such as admin, user, etc.
- id
- name
-
Token: This model stores the JWT tokens issued to users.
- id
- value (the token itself)
- user (reference to the User model)
- expiryAt (token expiry time)
For further reference, you can find a sample implementation on GitHub.
