Spring Cloud
Topics to be Covered:
-
API Gateway and Load Balancing
A discussion of API Gateways, Load Balancers, and their roles in microservices communication and traffic management. -
Spring Cloud
An overview of Spring Cloud’s role in simplifying microservices development, with a focus on service discovery, load balancing, and practical implementation.
API Gateway and Load Balancing
Overview:
In microservice architecture, the challenge of managing multiple services, such as UserService, ProductService, and PaymentService, arises as these services need to communicate effectively. Each service may have several instances running to ensure scalability and reliability. Handling this complexity manually (e.g., through direct REST calls) can lead to issues like increased latency, misdirected traffic, or server overloads. This is where API Gateways and Load Balancers come into play.
Communication Challenge in Microservices:
- Imagine a scenario where the UserService wants to request information from the ProductService.
- This is typically done by making a REST call using something like
restTemplate.get(url), where the URL might look likehttp://localhost:8080/products. - However, in a real-world production environment, there might be multiple instances of ProductService running. This raises two key challenges:
- Which instance of ProductService should the UserService call?
- How should the UserService know the correct IP or URL for each instance of ProductService?
- Hardcoding the IP addresses of the service instances isn’t practical because service instances can be added or removed dynamically.
API Gateway:
- An API Gateway serves as the central entry point for all client requests to the microservices architecture.
- Its main responsibility is to forward incoming requests to the appropriate microservice based on the request’s path or parameters. For example:
- A request like
/products/123will be forwarded to ProductService. - A request like
/orders/456will be routed to OrderService.
- A request like
- The API Gateway hides the complexity of multiple services from the client, simplifying the architecture and decoupling the client from the service structure.
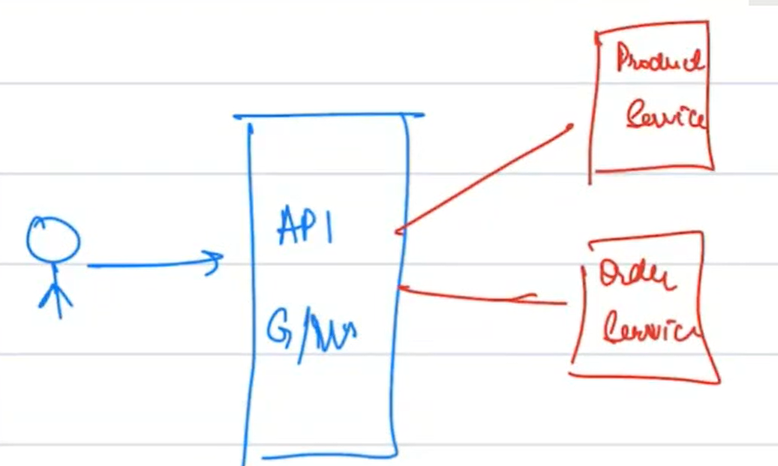
- The benefit of using an API Gateway is that the client only needs to know the gateway’s URL. The gateway takes care of determining which microservice instance to route the request to.
- However, once a request reaches ProductService, there may still be multiple instances of ProductService running. How do we decide which instance should handle the request? This is where the Load Balancer comes into play.
Load Balancer:
- A Load Balancer is responsible for distributing incoming requests across multiple instances of the same service (e.g., multiple instances of ProductService).
- Its primary goal is to ensure that no single instance is overwhelmed with too much traffic. It balances the load among all available instances so that each receives an equitable share of requests.
- The Load Balancer typically uses algorithms like Round Robin (distributing requests in a circular fashion) or Least Connections (sending traffic to the instance with the fewest current connections).

Key Differences Between API Gateway and Load Balancer:
- API Gateway: The main function of the API Gateway is to route the request to the correct microservice based on the path or parameters.
- Load Balancer: The Load Balancer’s job is to distribute the load evenly among the instances of a specific microservice, ensuring efficient use of server resources.
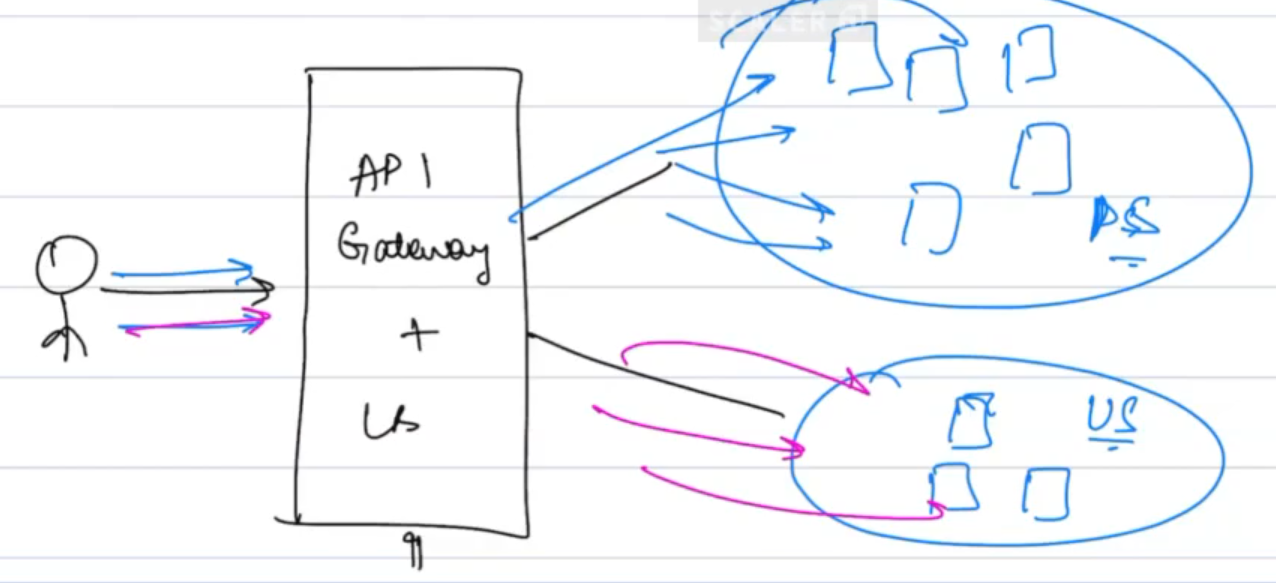
Combining API Gateway and Load Balancer:
- In modern architectures, a single server can sometimes act as both an API Gateway and a Load Balancer. This means that the same server that routes the traffic to the appropriate microservice also ensures that the traffic is balanced among the instances of that service.
- For example, a request to the API Gateway will be forwarded to ProductService, and the same system will decide which specific instance of ProductService should handle that request.
Communication Between Microservices:
- There are times when one microservice, such as ProductService, needs to call another microservice, like UserService.
- In such cases, the question arises:
Should ProductService make a direct call to UserService, or should it go through the API Gateway?
- Going through the API Gateway might introduce unnecessary latency because the request would need to be routed twice: first to the API Gateway and then to the correct microservice.
- Therefore, it’s more efficient for ProductService to communicate directly with UserService.
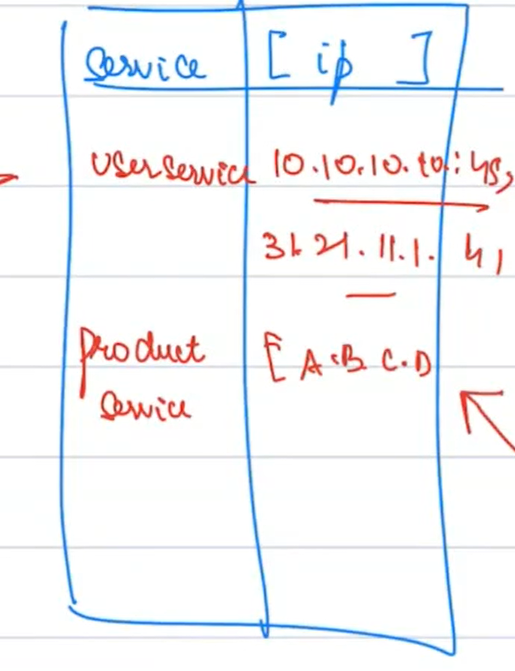
Service Discovery:
- Microservices should not hardcode IP addresses for other services. Instead, they use Service Discovery to dynamically locate the available service instances.
-
Service Discovery acts as a centralized directory that keeps track of all active instances of each microservice.
- When a new instance of ProductService or UserService starts up, it registers itself with the Service Discovery server.
- When ProductService needs to call UserService, it queries Service Discovery to get a list of all running instances of UserService.
-
Service Discovery does not perform load balancing. It merely provides a list of available instances to the calling service, which then chooses one to send its request to.
Client-Side Load Balancing:
- With Client-Side Load Balancing, each instance of a service (e.g., ProductService) knows about all instances of the other service (e.g., UserService) and selects which one to call.
- The client (e.g., ProductService) performs the load balancing by distributing requests evenly across the available instances of UserService.
Spring Cloud
Introduction to Spring Cloud:
- Spring Cloud is a framework that provides a collection of tools designed to simplify the development of microservices.
- It abstracts away much of the complexity involved in setting up distributed systems by providing ready-made solutions for common patterns like Service Discovery, Load Balancing, and API Gateways.
- Many of these tools were initially developed by Netflix, which has been a pioneer in microservices architecture. As a result, Netflix components like Eureka (for service discovery) and Zuul (for API gateways) are widely used within Spring Cloud.
Setting Up Service Discovery with Spring Cloud (Using Eureka):
- In Spring Cloud, Eureka is the default tool for implementing Service Discovery. It allows microservices to register themselves and discover other services dynamically.
- We will now walk through setting up Eureka for service discovery in a Spring Boot project.
Step-by-Step Guide:
-
Create a Spring Project for Service Discovery:
- First, create a Spring Boot application for Service Discovery using Eureka.
- In the
application.propertiesfile of the Eureka server, configure the following:server.port=8761 eureka.client.register-with-eureka=false eureka.client.fetch-registry=false - This configuration tells Eureka to act as a service registry rather than a client.
-
Add Eureka Server Dependency in
pom.xml:- To enable the Eureka server, include the following dependency in your project’s
pom.xmlfile:<dependency> <groupId>org.springframework.cloud</groupId> <artifactId>spring-cloud-starter-netflix-eureka-server</artifactId> <version>4.1.0</version> </dependency>
- To enable the Eureka server, include the following dependency in your project’s
-
Running ProductService:
- Now, let’s run ProductService and make it discoverable by the Eureka server.
- Add the Eureka Client dependency to ProductService in its
pom.xmlfile:<dependency> <groupId>org.springframework.cloud</groupId> <artifactId>spring-cloud-starter-netflix-eureka-client</artifactId> <version>4.1.0</version> </dependency>
-
Configure ProductService Properties:
- Modify the
application.propertiesfile of ProductService to enable it to register with Eureka:eureka.client.register-with-eureka=true eureka.client.fetch-registry=true spring.application.name=productservice eureka.client.service-url.defaultZone=http://localhost:8761/eureka
- Modify the
-
Registering Multiple Instances of ProductService:
- To simulate load balancing, start multiple instances of ProductService on different ports (e.g., 3000, 3001, 3002, 3003).
- Each instance will automatically register itself with the Eureka service discovery server, as shown in the Eureka dashboard.

-
Configuring and Running UserService:
- Follow the same steps for setting up UserService as you did for ProductService. Ensure that UserService registers with Eureka and runs on multiple ports.

- Follow the same steps for setting up UserService as you did for ProductService. Ensure that UserService registers with Eureka and runs on multiple ports.
Calling UserService from ProductService:
-
Initial Hard-Coded Approach:
- Initially, the ProductService might make a hard-coded REST call to UserService as follows:
ResponseEntity<UserDto> userDto = restTemplate.getForEntity(
                "http://localhost:9002/users/1",
                UserDto.class);
- Initially, the ProductService might make a hard-coded REST call to UserService as follows:
-
Refactor for Client-Side Load Balancing:
-
To eliminate hardcoded URLs and enable dynamic service discovery and load balancing, create a
RestTemplateConfigclass in ProductService:@Bean @LoadBalanced public RestTemplate createRestTemplate() { return new RestTemplate(); } -
Then, modify the REST call to use the service name instead of the hardcoded URL:
ResponseEntity<UserDto> userDto = restTemplate.getForEntity(
                "http://userservice/users/1",
                UserDto.class);
-
-
Demonstrating Load Balancing:
- Each time ProductService makes a call to UserService, the client-side load balancer distributes the requests among all active instances of UserService.
- This ensures that no single instance of UserService is overloaded, improving the system's overall efficiency.
