Working with Git Remotes, Forks, Pull requests
Topics to be covered
- Merge
- Rebase
- Best Practices with Merge and Rebase
- HEAD pointer
- Clone
- Push
- Fetch -> git remote
- Pull
- submitting first Pull Request
- Git cherry-picking
Key Concepts Covered:
-
What is Git?
- Git is a distributed version control system that allows multiple developers to work on a project simultaneously without overwriting each other's changes.
-
Version Control Systems (VCS):
- There are different types of VCS, including centralized and distributed systems, highlighting Git as a distributed VCS.
-
Commits in Git:
- Git's entire system is built around a series of commits, where each commit represents a snapshot of the project's file system at a particular point in time.
-
Delta Changes:
- Git stores changes between commits, known as "delta changes," rather than storing each version of a file in its entirety.
-
Branching:
- Branching allows developers to diverge from the main project and work on features or fixes independently, without affecting the main codebase.
Critical Thinking Question:
- Should all changes be made directly on the main deployed branch?
- The answer is No. Directly working on the main branch, especially when deploying changes, can lead to instability and issues in production. Instead, separate branches should be created for each feature or fix. These branches allow developers to work independently and only merge their changes into the main branch when they are ready for deployment.
Workflow for Feature Development:
- Branch Creation: Separate branches are created for individual features or bug fixes.
- Development: Work is done on these branches until the feature or fix is complete.
- Merging: Once the work is finalized and tested, the changes are merged back into the main branch, making them ready for deployment.

This session will focus on learning the various methods to integrate these feature branches into the main branch, with a particular emphasis on merging.
Git Merge
Understanding the Merge Workflow
Scenario:
Let's consider a practical example to understand how merging works in Git. Imagine that you are working on a web project for Scaler, and you need to make modifications to the website's Navbar.
- Initial Step:
You realize that these changes will take a few days to complete. To manage your work efficiently, you decide to create a new branch named navbar_adjust.
- Development:
You work on this branch independently, making the necessary changes to the Navbar without affecting the main branch or any other feature branches.
- Completion:
Once the modifications are complete and tested, the next step is to integrate these changes into the main branch, so they are ready for deployment.
Steps to Merge:
- Switch to the Main Branch:
- Before merging, you need to switch to the branch into which you want to integrate your changes. This is typically the main branch, which is often referred to as
mainormaster. - Command:
git checkout main
- Before merging, you need to switch to the branch into which you want to integrate your changes. This is typically the main branch, which is often referred to as
- Execute the Merge Command:
- Once on the main branch, use the
git mergecommand to integrate the changes from your feature branch. - Command:
git merge navbar_adjust - What happens behind the scenes:
- Git identifies the latest commit on the feature branch (
navbar_adjust) and the latest commit on the main branch.
- Git identifies the latest commit on the feature branch (
- It then creates a new commit on the main branch, known as a merge commit, which has two parent commits:
- The latest commit from the feature branch.
- The latest commit from the main branch.
- Once on the main branch, use the
Visualizing the Merge Process:
This illustration shows how Git creates a new commit that connects the histories of both branches, integrating the changes from the feature branch into the main branch.
Ambiguity in Git During Merges
While the merging process may seem straightforward, certain situations can lead to ambiguities that Git cannot resolve automatically. Let’s explore a common scenario where this happens.
Scenario:
- Imagine you have a file named
new.txtin your project.
File States During the Merge Process:
- Original File in the Main Branch:
- Initially, the file
new.txthas some content in the main branch.
- Initially, the file

- Modification in the Feature Branch:
- While working on the
navbar_adjustbranch, you make some changes tonew.txt.
- While working on the

- Modification in the Main Branch:
- Meanwhile, another developer modifies the same
new.txtfile in the main branch, making different changes.
- Meanwhile, another developer modifies the same

Critical Thinking Question for Learners:
- What will happen to the file when you try to merge the feature branch into the main branch?
Potential Outcomes:
-
The contents of the file after the merge could vary depending on how the changes are integrated. For example:
-
Potential Outcome -1:

- Potential Outcome -2:

Merge Conflict:
- Since Git cannot automatically decide which version of the file to keep, it raises a merge conflict.
A merge conflict occurs when changes in different branches affect the same lines in a file, and Git needs guidance on how to resolve these differences.
Handling Merge Conflicts:
- When a merge conflict occurs, Git stops the merging process and asks the developer to manually resolve the conflict. Git presents both versions of the conflicting file, allowing the developer to choose the correct content.
Steps to Resolve a Merge Conflict:
-
Identify the Conflict:
- Open the file where the conflict has occurred. Git will mark the conflicting sections of the file.
-
Edit the File:
- Decide which changes to keep, modify the file accordingly, and remove the conflict markers.
-
Stage the Changes:
- Use
git addto mark the conflict as resolved. - Command:
git add new.txt - Commit the Resolution:
- Commit the changes to complete the merge.
- Command:
git commit -m "Resolved merge conflict in new.txt"
- Use
This method of resolving conflicts is known as a three-way merge. It involves the two branches being merged and their common ancestor.
Fast-Forward Merge
In some cases, Git can perform a fast-forward merge, which is simpler and more efficient than a three-way merge.
What is a Fast-Forward Merge?
- A fast-forward merge occurs when there is no need to create a new commit because no new commits have been added to the main branch since the feature branch was created.
Conditions for a Fast-Forward Merge:
- No New Commits in the Main Branch:
- If the main branch has remained unchanged while work was done on the feature branch, a fast-forward merge is possible.
- Direct Integration:
- The feature branch's commits can be directly added to the main branch without conflict.
Visualizing a Fast-Forward Merge:
In this illustration, the main branch pointer is simply moved forward to the latest commit of the feature branch, integrating the changes without creating a new merge commit.
Advantages of Fast-Forward Merge:
- No Merge Conflicts: Since there are no competing changes, conflicts are avoided.
- Clean History: The commit history remains linear and easy to understand.
Limitations:
- Fast-forward merges are rare in large projects where multiple developers are working simultaneously, as it is unlikely that the main branch remains untouched.
Best Practice:
- If possible, strive for fast-forward merges to maintain a clean and conflict-free commit history.
Problems with Three-Way Merging
While three-way merging is effective for integrating changes, it does come with some drawbacks:
-
Merge Conflicts:
- Frequent and complex merge conflicts can arise, requiring manual resolution.
-
Jumbled Commit History:
- The commit history can become non-linear and difficult to follow. For example, consider the following scenario:
Example of a Jumbled Commit History:
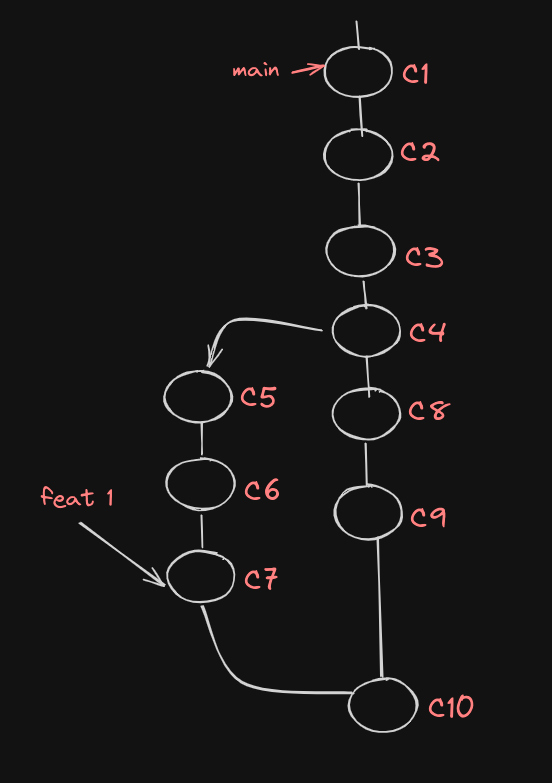
In this situation, the commit history is not linear, which can lead to confusion when trying to track changes or revert to previous states.
Ideal Commit History:
- To maintain clarity, the commits related to a specific feature should be grouped together, as shown below:

This grouping makes it easier to identify and revert changes related to a particular feature without affecting unrelated commits.
Solution:
- To maintain an organized and linear commit history, we can use Git Rebase.
Git Rebase
Understanding the Rebase Command
What is Rebase?
The git rebase command is used to move or combine a sequence of commits to a new base commit. This allows you to place your feature branch's commits on top of the latest changes in the main branch, creating a clean and linear commit history.
Rebase Command:
-
To rebase your feature branch onto the main branch, follow these steps:
-
Switch to the Feature Branch:
- Command:
git checkout navbar_adjust -
Execute the Rebase Command:
-
Command:
git rebase main
- Command:
What Happens During a Rebase:
- Rebasing takes the commits from your feature branch and re-applies them on top of the latest commit in the main branch. This effectively "replays" your changes on top of the current state of the main branch.
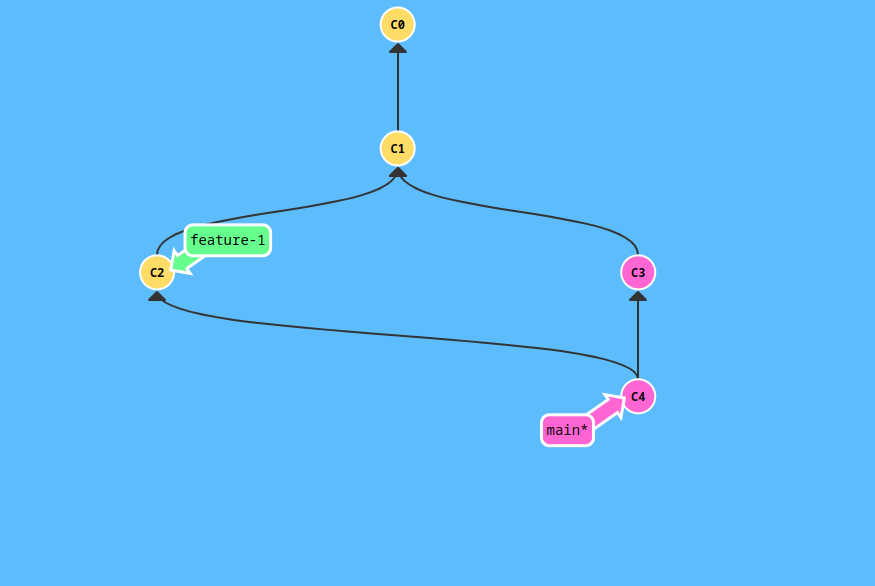
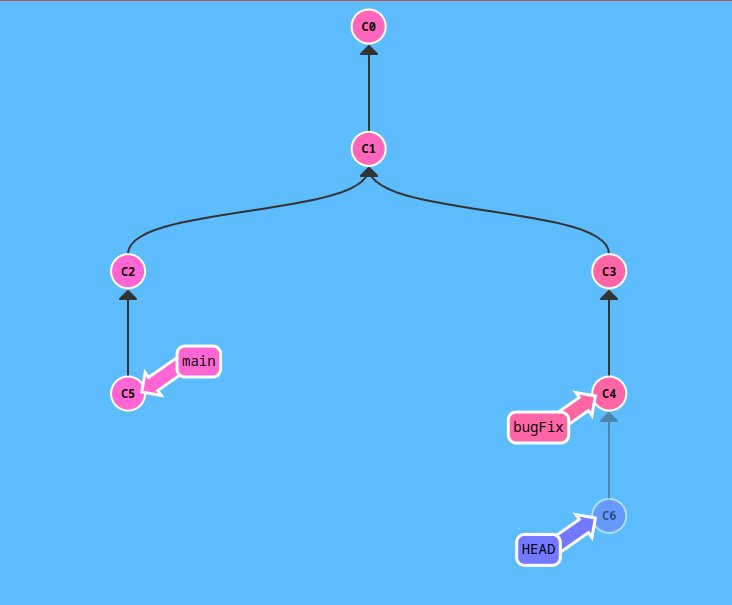
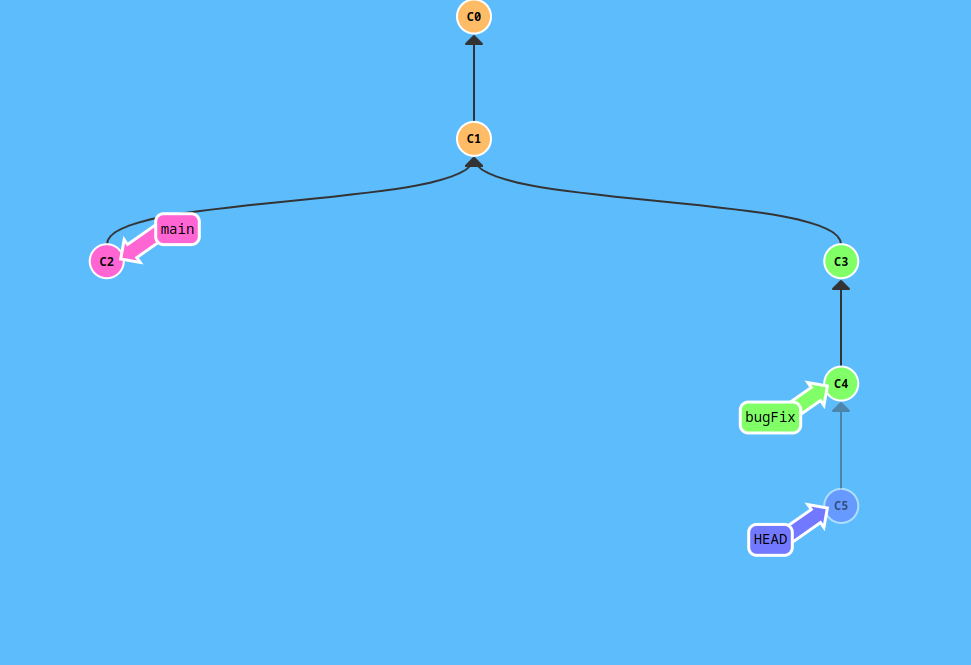
Visualizing the Rebase Process:

In this illustration, the commits from the navbar_adjust branch (C2 and C3) are reapplied on top of the latest commit from the main branch (C1), resulting in a clean and linear history.
Best Practices for Rebasing
-
Frequent Rebasing:
- To minimize conflicts and keep your feature branch up-to-date with the main branch, it is recommended to rebase frequently. This ensures that your changes are always applied on top of the latest code, reducing the risk of merge conflicts.
Example of Frequent Rebasing:

By regularly rebasing your feature branch, you can ensure that the final merge is a fast-forward merge, which is cleaner and conflict-free.
Handling Conflicts During Rebase
Just like merging, rebasing can also lead to conflicts when the same lines of code have been modified in both the feature branch and the main branch.
Steps to Handle Rebase Conflicts:
- When a conflict occurs during a rebase, Git will pause the process and notify you of the conflict.
- Resolve the conflict in the same way as a merge conflict: edit the file, stage the changes with
git add, and continue the rebase withgit rebase --continue. - If you want to abort the rebase and return to the previous state, use
git rebase --abort.
Rebase vs. Merge
-
Rebase and Merge Together:
- It’s not about choosing between rebase and merge. Instead, use rebase to keep your feature branch updated and clean, and then merge to integrate the changes into the main branch.
Scenario: Multiple Feature Branches
- Imagine a scenario where multiple feature branches exist, and changes have also been pushed to the main branch.
- To ensure a clean integration, each feature branch should be rebased onto the main branch before merging.
Illustration: Rebasing Multiple Branches
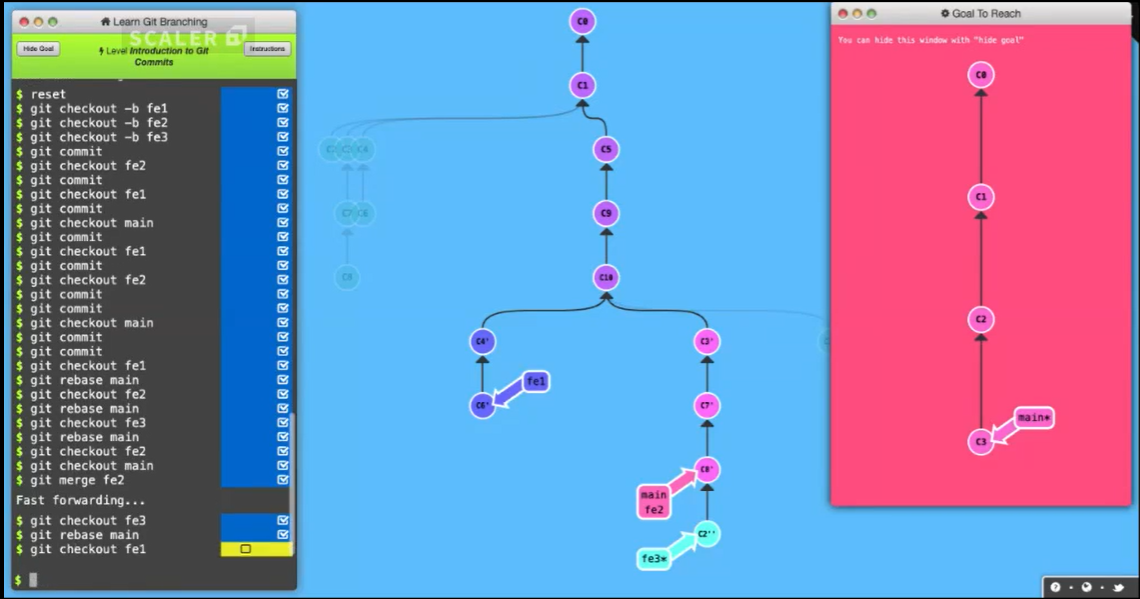
By rebasing each branch onto the main branch, you can ensure that all branches are synchronized with the latest changes, reducing the risk of conflicts during the final merge.
Conclusion: Rebase and Then Merge
- Rebase before merging to maintain a linear and organized commit history.
- This approach combines the benefits of both methods, ensuring that your codebase remains clean, conflict-free, and easy to manage.
HEAD Pointer
Understanding the HEAD Pointer
The HEAD pointer in Git is a reference to the current active branch and the latest commit on that branch. It plays a crucial role in determining where new commits will be added.
Key Points:
- HEAD Pointer: Points to the latest commit in the currently active branch.
- Commit Reference: When you make a new commit, it is added on top of the commit pointed to by HEAD.
Visualizing the HEAD Pointer:
In this illustration, the * symbol represents the HEAD pointer, which indicates the latest commit in the current branch. If you commit new changes, they will be added to this commit.
Detached HEAD
A detached HEAD state occurs when the HEAD pointer is not attached to any branch but is instead pointing directly to a specific commit.
How Does This Happen?
- A detached HEAD can occur if you checkout a specific commit without creating a new branch. This can lead to potential issues if you try to make changes and commit them, as those changes will not belong to any branch.
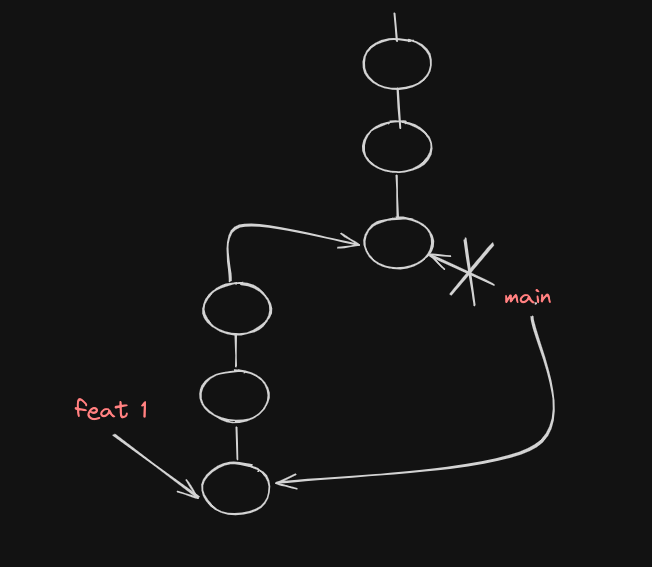
Illustration: Detached HEAD
In this situation, any new commits will be isolated from the main branch unless you explicitly create a new branch or merge them into an existing branch.
Branch Creation from HEAD
- A new branch can be created at any point where the HEAD is currently located. This allows you to capture the current state of your project and start working on a new feature or fix from that point.
Git Remotes
Introduction to Git Remotes
working locally with Git so Good but it’s important to understand how Git operates in a collaborative environment, where multiple developers might be working on the same project.
Problem:
- If another developer needs to push changes to the main branch, they would need access to your local machine, which is not practical in a distributed development environment.
Solution:
- This is where Git remotes come into play. Platforms like GitHub, GitLab, and BitBucket provide a centralized location where repositories can be hosted, allowing developers to collaborate from anywhere.
Understanding Distributed Version Control:
- Git is a distributed version control system, meaning that every developer has a complete copy of the repository, including its full history. Changes are made locally and then pushed to a remote repository, where they can be shared with others.
Creating a Remote Repository
Let’s go through the steps to create a remote repository on GitHub and push your local project to it.
-
Create a Repository on GitHub:
- Start by creating a new repository on GitHub.
- You can choose to initialize the repository with a README file, or you can push an existing project from your local machine.
-
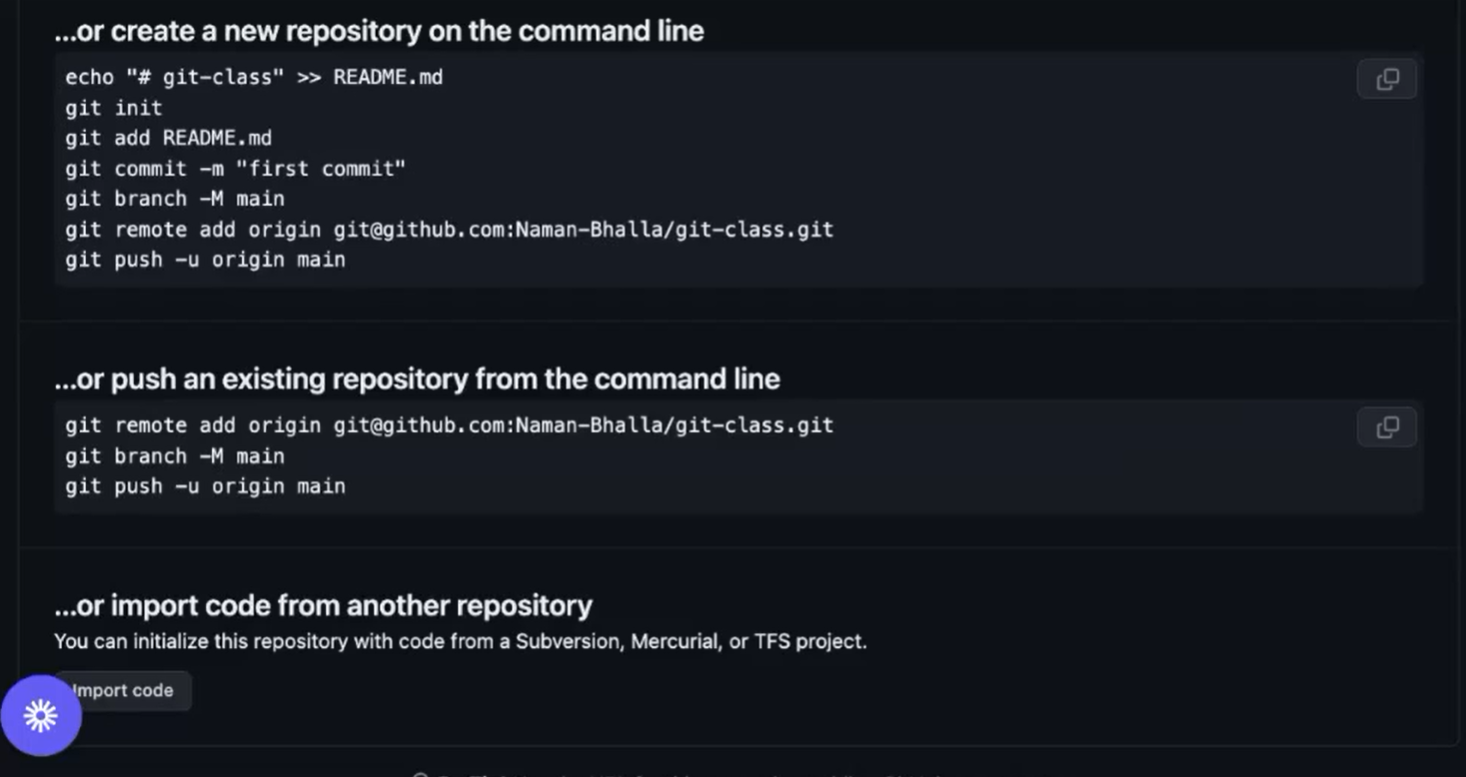
Link Your Local Repository to the Remote:
- To connect your local Git repository to the remote GitHub repository, use the
git remote addcommand. - Command:
git remote add origin [email protected]:User/UserRepo.git - Here,
originis the name given to the remote repository, and the URL points to the location of the repository on GitHub.
- To connect your local Git repository to the remote GitHub repository, use the
-
Push Your Local Project to GitHub:
- Once the remote is set up, you can push your local branch to the remote repository using the
git pushcommand. - Command:
git push -u origin main - The
-uflag sets the upstream branch, meaning futuregit pushcommands will automatically push changes to this remote branch.
- Once the remote is set up, you can push your local branch to the remote repository using the
Practical Example:
Imagine you have been working on a project locally and now want to share it with your team by pushing it to a remote repository on GitHub. Follow these steps:
- Create the Remote Repository: First, create a new repository on GitHub.
- Link the Repository: Use
git remote add originto link your local repository to the remote one. - Push the Code: Finally, push your local branches to the remote using
git push. This makes your code available to your team on GitHub.
