IMDB Pagination Sorting, Searching, filtering
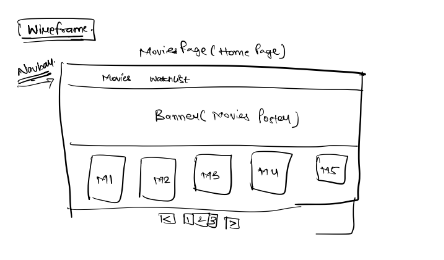
Today's agenda will primarily revolve around working on the watchlist component. However, before diving into the watchlist, we'll address a few tasks related to the movie component. In our current project, we've already implemented features like pagination and banners, showcasing various movies. Now, we're at the stage where we want to provide users with the ability to take actions, such as adding a movie to their watchlist.
At this moment, our watchlist is empty, so we'll focus on designing and developing this component.
Let's return to the code. We'd like to include an "Add to Watchlist" button for each movie card, as shown here:
Note to instructor - Help students understand and brainstorm this feature.
Now, let's navigate to the movies section and pick up from where we left off to add the watchlist functionality.
Pseudocode
function Movies() {
    const [watchList, setWatchList] = useState([]);
}
We will start by initializing this as an empty array. One by one, we will add the IDs of all the movies, and then we will retrieve the movies based on their IDs.
[Ask the leaners]
Now, how can we implement the process of clicking on a movie to obtain its ID and store it in the watchlist? Do you have any suggestions?
One approach is to use filtering based on the movie's ID. To begin, we will add a button to our movie card. Inside the card div, we will create another div to accommodate this button.
Pseudocode
<div className="">
    😀
</div>
Pseudocode
<div className="p-2 bg-gray-900 rounded-xl absolute right-2 top-2">
    😀
</div>
If a movie has not been added to the watchlist, you should display an emoji. If it's already on the watchlist, you should display a cross sign. As of now, the watchlist is empty.
The purpose of adding a movie to the watchlist is that when we click on the emoji, a function should be triggered to provide us with the ID of the movie we've clicked on.
Pseudocode
// watchList handlers

const addToWatchList = () => {
    const newWatchList = [...watchList, id];
    setWatchList(newWatchList);
}
Let's explore how the spread operator functions.

Note to instructor - Help students understand this.
Now, let's shift our focus back to our div. We are simply going to invoke this.
[Ask the leaners]
What should be passed as the argument in this context? The movie ID should be passed as the argument here.
Pseudocode
<div className="p-2 bg-gray-900 rounded-xl absolute right-2 top-2">
    <div onClick={() => addToWatchList(movie.id)}>
        😀
    </div>
</div>
We have wrapped the addToWatchList(movie.id) function call in an arrow function to ensure it's triggered correctly when clicked. So, when you click on this emoji, it will trigger a click event that, in turn, activates the "addToWatchList" function and retrieves the specific ID of the movie.
Note to instructor - Feel free to test this functionality out.
To demonstrate how the spread operator works, we will create a "test.js" file and write the code accordingly.
Pseudocode
let arr = [1, 2, 3, 4, 5];
let updatedArr = [...arr, 6];
console.log(updatedArr);
Note to instructor - Feel free to test this and help students with the concept of spread operator.
Next, we will examine the functionality of a cross button for removing items from the watchlist, involving conditional code.
Pseudocode
<div className="p-2 bg-gray-900 rounded-xl absolute right-2 top-2">
    {watchList.includes(movie.id) === false ? (
        <div onClick={() => addToWatchList(movie.id)}>
            😀
        </div>
    ) : (
        <div>
            ❌
        </div>
    )}
</div>
If the movie ID is not present in my watchlist, then for those movies, display the "Add to Watchlist" button. Otherwise, show the "Remove from Watchlist" button.
At a high level, here are the steps we've taken:
- Added the "Add to Watchlist" button.
- When clicked, the ID of that movie is added to the watchlist array.
- Created the onClick event and the addToWatchList function.
- Now, we also need a feature to remove movies from the watchlist.
- To achieve this, we will create the removeFromWatchList function, which will filter out the specified ID from the watchlist.
Now, we can proceed to create the "Remove from Watchlist" function.
Pseudocode
// watchList handlers

const addToWatchList = (id) => {
    const newWatchList = [...watchList, id];
    setWatchList(newWatchList);
}

const removeFromWatchList = (id) => {
    const filteredWatchList = watchList.filter((watchListId) => {
        return watchListId !== id;
    });
    setWatchList(filteredWatchList);
}
Note to instructor - Feel free to test this.
Note to instructor - Feel free to wait and address any questions that students might have.
Now, let's write the code that allows us to remove a movie from our watchlist when we click on the cross button.
Pseudocode
<div className="p-2 bg-gray-900 rounded-xl absolute right-2 top-2">
    {watchList.includes(movie.id) === false ? (
        <div onClick={() => addToWatchList(movie.id)}>
            😀
        </div>
    ) : (
        <div onClick={() => removeFromWatchList(movie.id)}>
            ❌
        </div>
    )}
</div>
Note to instructor - Feel free to test this.
Note to instructor - Feel free to wait and address any questions that students might have.
[Ask the leaners]
We don't want these buttons to be shown by default and would like them to appear only when we hover over the movie cards. Do you have any suggestions for this?
-> In React, everything is controlled by the state. So, we can create a state to manage the visibility of these buttons.
Pseudocode
function Movies() {
    const [hovered, setHovered] = useState('');
}
Now, we will create two functions:
Pseudocode
const showButton = (id) => {
    setHovered(id);
}

const hideButton = (id) => {
    setHovered('');
}
We can create an additional div element for hovering over a movie.
Pseudocode
<div
    onMouseEnter={() => showButton(movie.id)}
    onMouseLeave={() => hideButton()}
>
</div>
Now, we'll apply CSS to show this element only when the movie ID matches.
Pseudocode
<div className="p-2 bg-gray-900 rounded-xl absolute right-2 top-2" style={{ display: hovered === movie.id ? 'block' : 'none' }}>
    {watchList.includes(movie.id) === false ? (
        <div onClick={() => addToWatchList(movie.id)}>
            😀
        </div>
    ) : (
        <div onClick={() => removeFromWatchList(movie.id)}>
            ❌
        </div>
    )}
</div>
Note to instructor - Wait for 5-10 minutes for the break
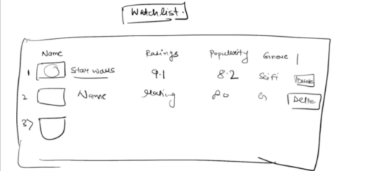
Now, let's proceed to the Watchlist component. Let's start by defining its visual design.
Note to instructor - Help students understand and brainstorm this.
Pseudocode
function WatchList() {
    let movies = {
        // some movie details here
    }

    return (
        <div className="overflow-hidden rounded-lg border border-gray-200 shadow-md m-5">
            <table className="w-full border-collapse bg-white text-left text-sm text-gray-500">
                <thead>
                    <tr className="bg-gray-50">
                        <th className="px-6 py-4 font-medium text-gray-900">Name</th>
                        <th>
                            <div className="flex">
                                <div>Ratings</div>
                            </div>
                        </th>
                        <th>
                            <div className="flex">
                                <div>Popularity</div>
                            </div>
                        </th>
                        <th>
                            <div className="flex">
                                <div>Genre</div>
                            </div>
                        </th>
                    </tr>
                </thead>
                <tbody className="divide-y divide-gray-100 border-t border-gray-100">
                    <tr className="hover:bg-gray-50">
                        <td className="flex items-center px-6 py-4 font-normal text-gray-900">
                            <img className="h-[6rem] w-[10rem] object-fit" src="" alt="" />
                            <div className="font-medium text-gray-700 text-sm">Star Wars</div>
                        </td>
                        <td className="pl-6 py-4">
                            7.8
                        </td>
                        <td className="pl-6 py-4">
                            7.8
                        </td>
                        <td className="pl-2 py-4">
                            Action
                        </td>
                    </tr>
                </tbody>
            </table>
        </div>
    );
}

export default WatchList;
Note to instructor - Please feel free to test if everything is functioning correctly up to this point.
Now, we'd like to incorporate this data. Inside the table body, We will utilize the movies array:
Pseudocode
function WatchList() {
    let movies = [
        // Some movie details here
    ];

    return (
        <div className="overflow-hidden rounded-lg border border-gray-200 shadow-md m-5">
            <table className="w-full border-collapse bg-white text-left text-sm text-gray-500">
                <thead>
                    <tr className="bg-gray-50">
                        <th className="px-6 py-4 font-medium text-gray-900">Name</th>
                        <th>
                            <div className="flex">
                                <div>Ratings</div>
                            </div>
                        </th>
                        <th>
                            <div className="flex">
                                <div>Popularity</div>
                            </div>
                        </th>
                        <th>
                            <div className="flex">
                                <div>Genre</div>
                            </div>
                        </th>
                    </tr>
                </thead>
                <tbody className="divide-y divide-gray-100 border-t border-gray-100">
                    {movies.map((movie) => (
                        <tr className="hover:bg-gray-50" key={movie.id}>
                            <td className="flex items-center px-6 py-4 font-normal text-gray-900">
                                <img className="h-[6rem] w-[10rem] object-fit" src="" alt="" />
                                <div className="font-medium text-gray-700 text-sm">{movie.title}</div>
                            </td>
                            <td className="pl-6 py-4">
                                {movie.vote_average}
                            </td>
                            <td className="pl-6 py-4">
                                {movie.popularity}
                            </td>
                            <td className="pl-2 py-4">
                                Action
                            </td>
                        </tr>
                    ))}
                </tbody>
            </table>
        </div>
    );
}

export default WatchList;
Note to instructor - Input some data into the movies array and replace all the hardcoded data. Afterward, test this component to ensure it functions correctly.
- Now, the WatchList component displays a list of movies.
- It uses the movie array to populate the movie details.
- Each movie is displayed within a table row (
). - Movie data such as title, vote average, and popularity are shown in respective columns.
- The code also includes styling classes for proper formatting and spacing.
